Objectives
In this Lab, you will be required to build the first version of our Donation Case Study App, called Donation.1.0. Here, we will add in a few UI widgets on a single layout and implement some basic event handling.
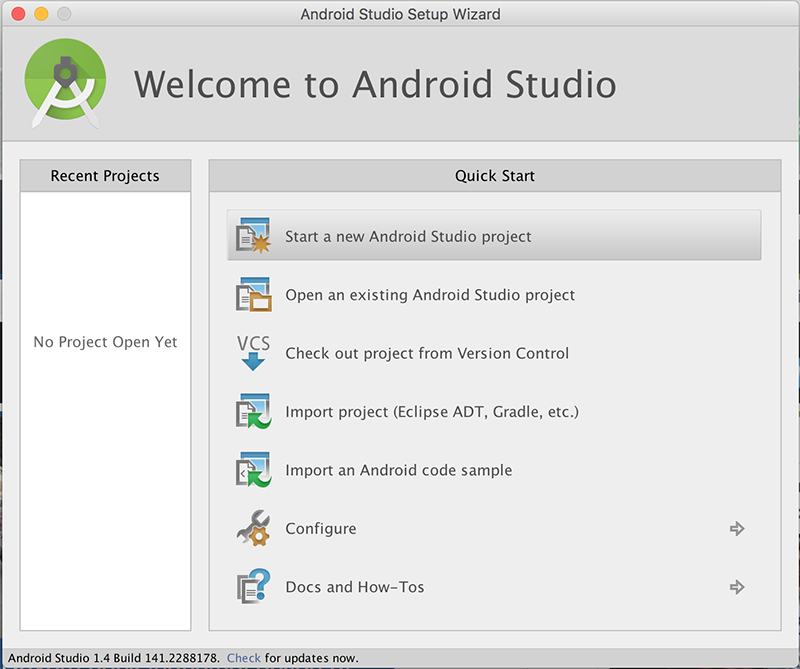
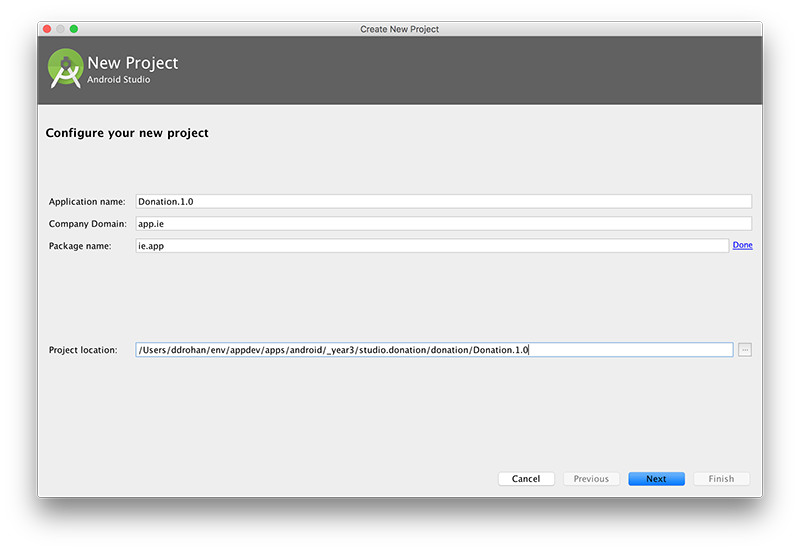
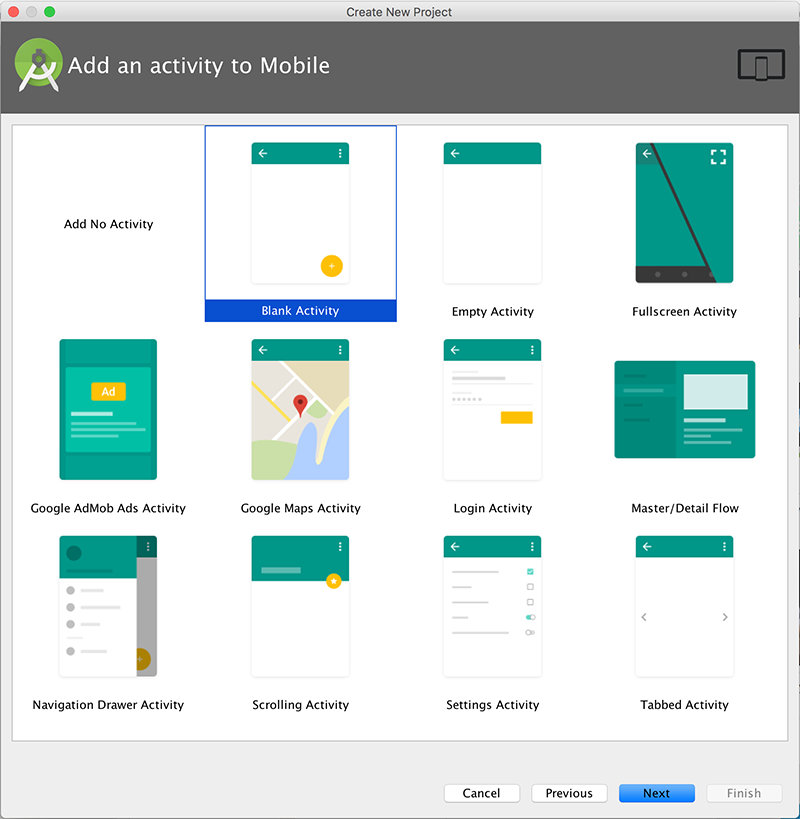
Step 01 - Create Project
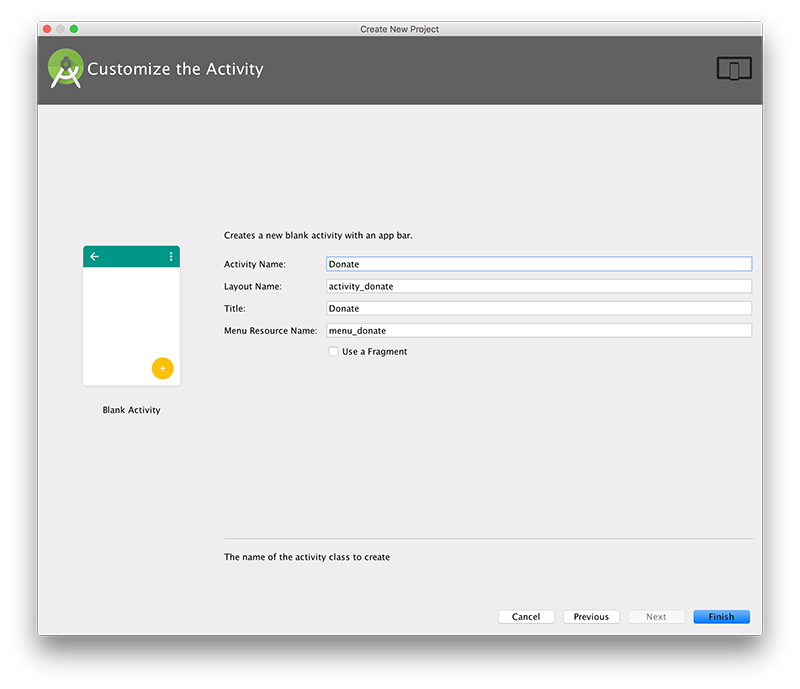
Create a new Android application, as demonstrated in the following 5 screenshots:
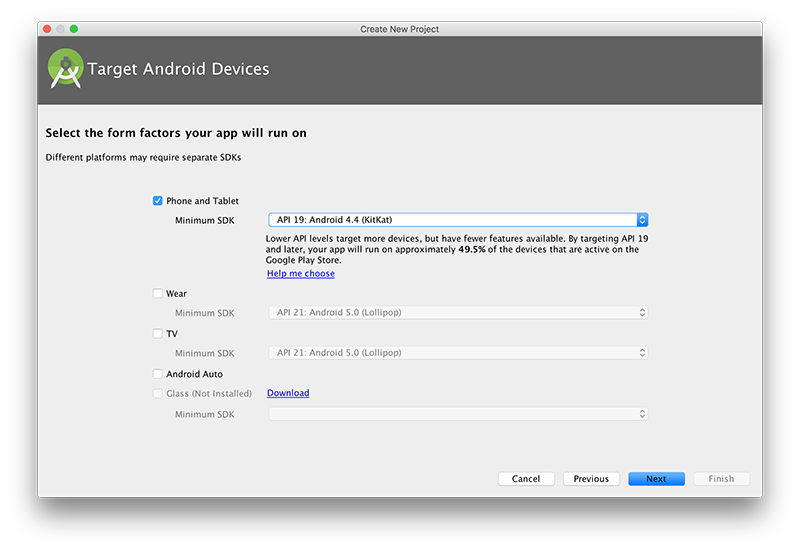
Note the 'Minimum Required SDK' which may be different from the default (as above).
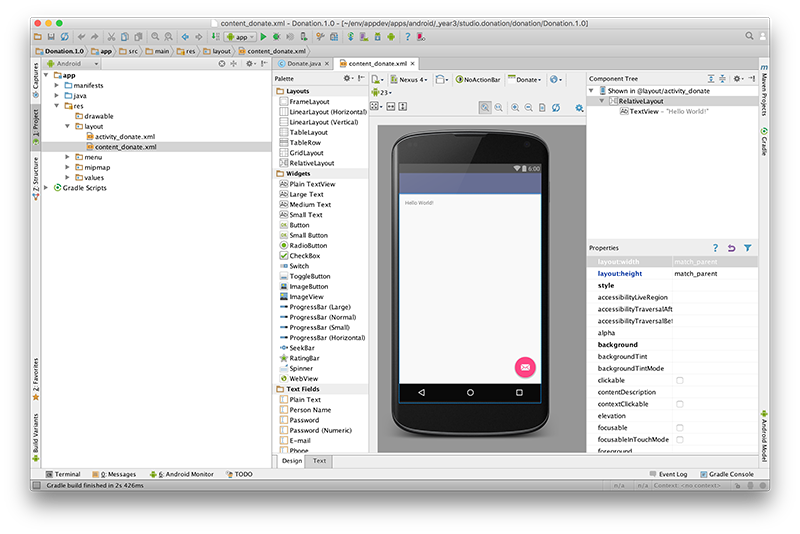
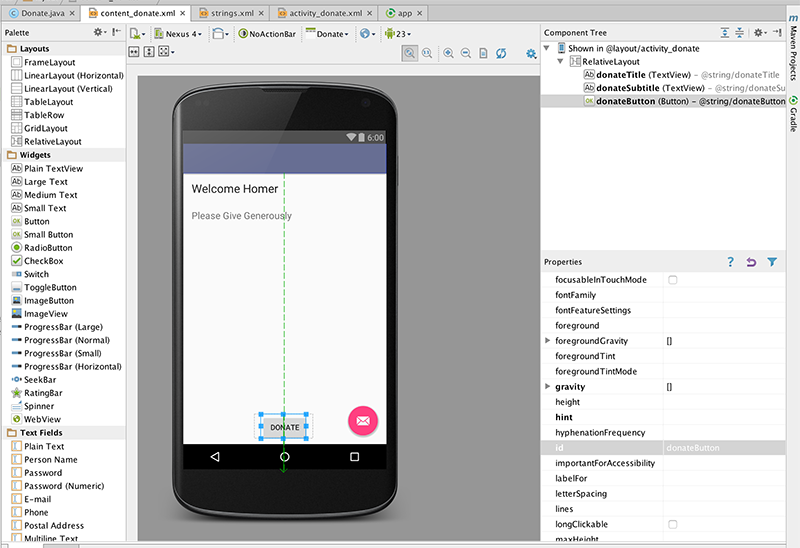
The opening project perspective is shown below, with the content_donate layout open in the visual designer:
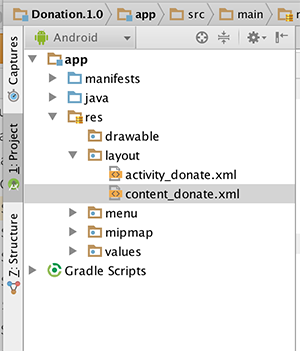
The project will look like this
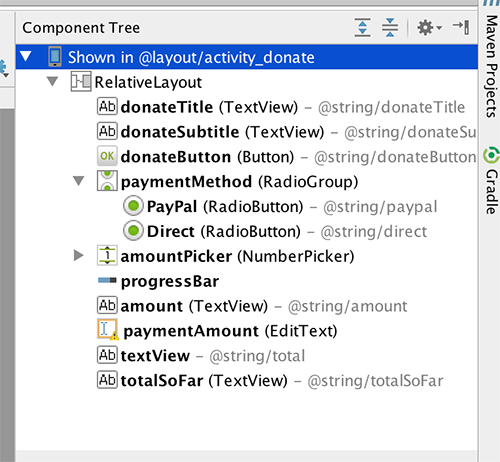
It is important to become familiar with the structure and purpose of the three panes surrounding the Donation 'canvas':
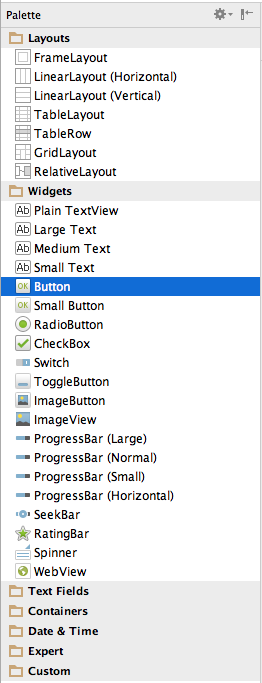
Pallette:
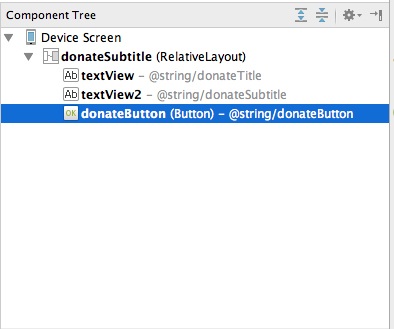
Outline
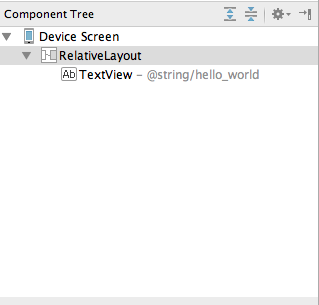
Properties
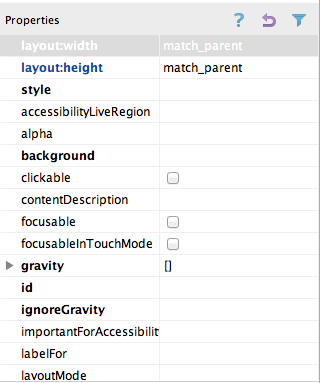
These views are closely related - and you will need to monitor the information displayed there continually as you evolve the appearance of your activities screens.
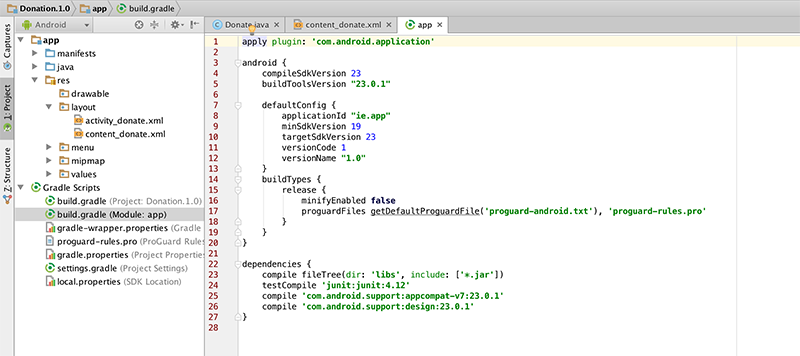
Also, take a quick look at your build.gradle file to see the configuration and dependencies of your app.
Step 02 - Donate Layout & Resources
On completion of this lab you'll be able to
design an initial layout for the app.
add different widgets (such as a button, text and picker) to a layout.
implement basic event handling to cause some action on the click of a button.
be able to 'filter' Log messages for testing and debugging.
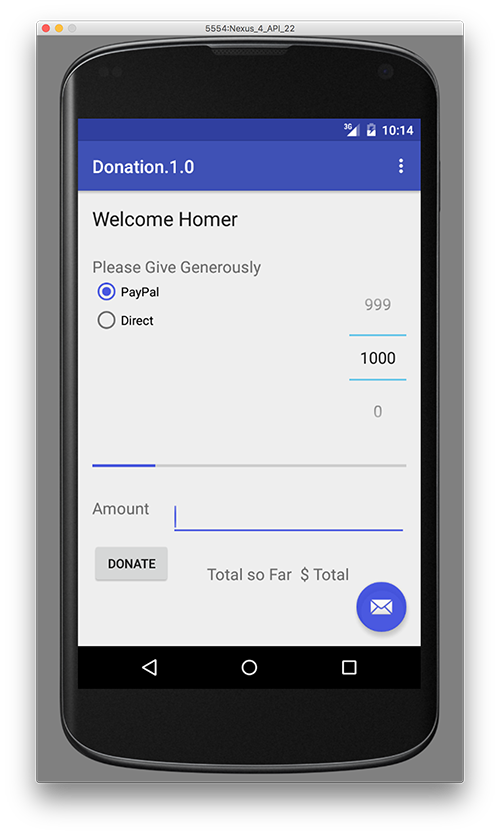
So, for this lab, our objective is to produce an Android App that looks something like this:

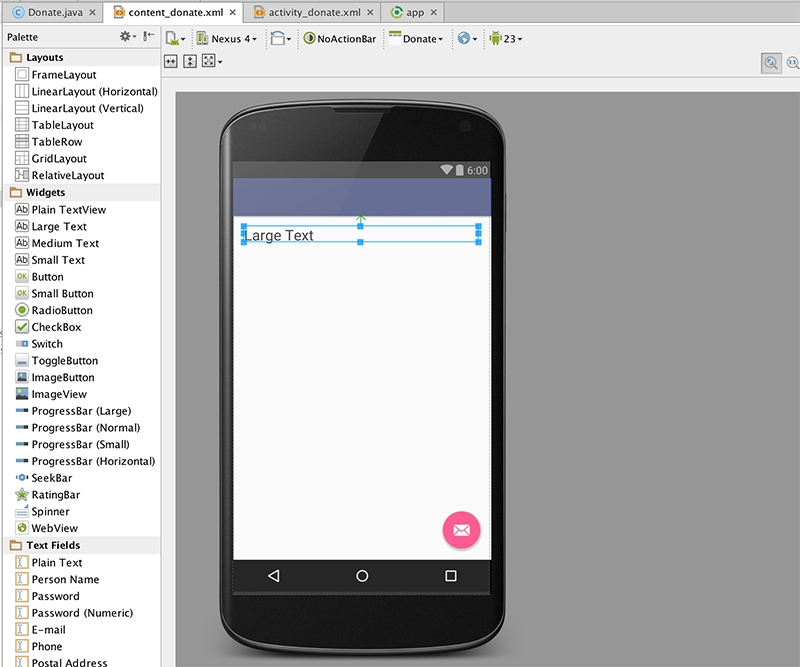
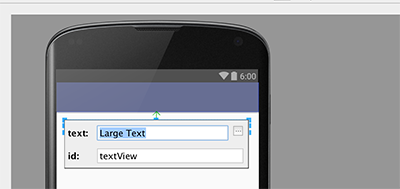
In your content_donate.xml, delete the current 'Hello World' text, and drag and drop a new 'LargeText' form widget onto the canvas, and 'stretch' the widget to fill the canvas (like below). Look closely at the following:
Now, Double-Click the widget and you will be presented with the following:
Select the elipse (on the right hand side, indicated below)
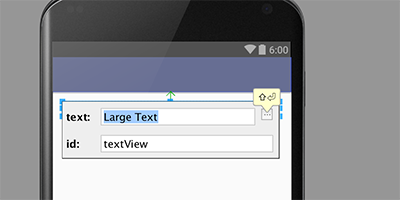
and you will be presented with the Resources Menu
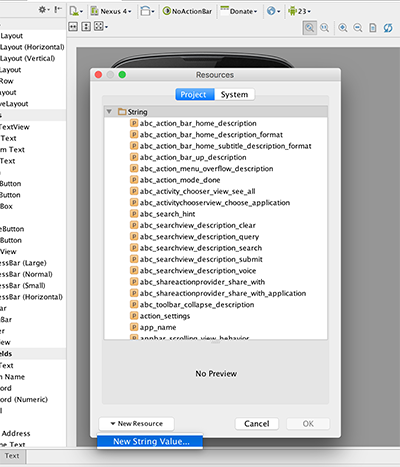
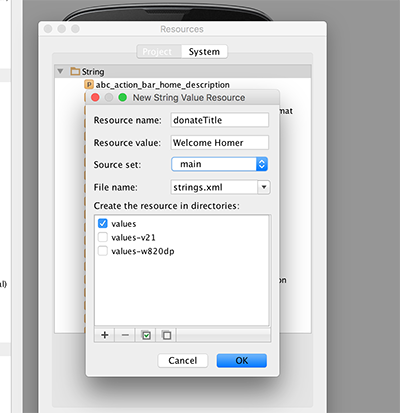
Select a 'New Resource->New String Value, and fill in the values as below
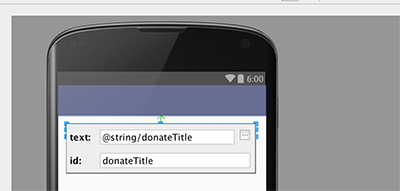
Double-Click the widget again and enter donteTitle for the id and hit return.
Once completed, you'll have something like this

Note carefully the following features:
- the guides tying the text to the left, top and right corner
- in Outline - the name of the control has been changed from a default to 'donateTitle'.
- in Properties - check the value for 'text' and notice we have a string reference linking to our strings.xml (below)

Locate the following two files and inspect them closely:
res/layout/content_dontate.xml
<?xml version="1.0" encoding="utf-8"?>
<RelativeLayout xmlns:android="http://schemas.android.com/apk/res/android"
    xmlns:tools="http://schemas.android.com/tools"
    xmlns:app="http://schemas.android.com/apk/res-auto" android:layout_width="match_parent"
    android:layout_height="match_parent" android:paddingLeft="@dimen/activity_horizontal_margin"
    android:paddingRight="@dimen/activity_horizontal_margin"
    android:paddingTop="@dimen/activity_vertical_margin"
    android:paddingBottom="@dimen/activity_vertical_margin"
    app:layout_behavior="@string/appbar_scrolling_view_behavior"
    tools:showIn="@layout/activity_donate" tools:context=".Donate">

    <TextView
        android:layout_width="wrap_content"
        android:layout_height="wrap_content"
        android:textAppearance="?android:attr/textAppearanceLarge"
        android:text="@string/donateTitle"
        android:id="@+id/donateTitle"
        android:layout_alignParentTop="true"
        android:layout_alignParentStart="true"
        android:layout_alignParentEnd="true" />
</RelativeLayout>
res/values/strings.xml
<resources>
    <string name="app_name">Donation</string>
    <string name="action_settings">Settings</string>
    <string name="donateTitle">Welcome Homer</string>
</resources>
Note the relationship between 'donateTitle' in both files.
Bring in the following string into the donate activity now - (medium text) - and follow the same procedure as above. The designer should look like this:

and our XML files will look something like this:
content_dontate.xml
<?xml version="1.0" encoding="utf-8"?>
<RelativeLayout xmlns:android="http://schemas.android.com/apk/res/android"
    xmlns:tools="http://schemas.android.com/tools"
    xmlns:app="http://schemas.android.com/apk/res-auto" android:layout_width="match_parent"
    android:layout_height="match_parent" android:paddingLeft="@dimen/activity_horizontal_margin"
    android:paddingRight="@dimen/activity_horizontal_margin"
    android:paddingTop="@dimen/activity_vertical_margin"
    android:paddingBottom="@dimen/activity_vertical_margin"
    app:layout_behavior="@string/appbar_scrolling_view_behavior"
    tools:showIn="@layout/activity_donate" tools:context=".Donate">

    <TextView
        android:layout_width="wrap_content"
        android:layout_height="wrap_content"
        android:textAppearance="?android:attr/textAppearanceLarge"
        android:text="@string/donateTitle"
        android:id="@+id/donateTitle"
        android:layout_alignParentTop="true"
        android:layout_alignParentStart="true"
        android:layout_alignParentEnd="true" />

    <TextView
        android:layout_width="wrap_content"
        android:layout_height="wrap_content"
        android:textAppearance="?android:attr/textAppearanceMedium"
        android:text="@string/donateSubtitle"
        android:id="@+id/donateSubtitle"
        android:layout_below="@+id/donateTitle"
        android:layout_alignParentStart="true"
        android:layout_marginTop="27dp"
        android:layout_alignEnd="@+id/donateTitle" />
</RelativeLayout>
strings.xml
<resources>
    <string name="app_name">Donation.1.0</string>
    <string name="action_settings">Settings</string>
    <string name="donateTitle">Welcome Homer</string>
    <string name="donateSubtitle">Please Give Generously</string>
</resources>
Step 03 - The 'Donate' Button
Place a button directly on to the activity - attached to the bottom of the screen as shown:
Following a similar procedure as in the previous step, rename the button and add an id, both called donateButton If all goes as expected, your xml files should be like this:
activity_donate.xml
<?xml version="1.0" encoding="utf-8"?>
<RelativeLayout xmlns:android="http://schemas.android.com/apk/res/android"
    xmlns:tools="http://schemas.android.com/tools"
    xmlns:app="http://schemas.android.com/apk/res-auto" android:layout_width="match_parent"
    android:layout_height="match_parent" android:paddingLeft="@dimen/activity_horizontal_margin"
    android:paddingRight="@dimen/activity_horizontal_margin"
    android:paddingTop="@dimen/activity_vertical_margin"
    android:paddingBottom="@dimen/activity_vertical_margin"
    app:layout_behavior="@string/appbar_scrolling_view_behavior"
    tools:showIn="@layout/activity_donate" tools:context=".Donate">

    <TextView
        android:layout_width="wrap_content"
        android:layout_height="wrap_content"
        android:textAppearance="?android:attr/textAppearanceLarge"
        android:text="@string/donateTitle"
        android:id="@+id/donateTitle"
        android:layout_alignParentTop="true"
        android:layout_alignParentStart="true"
        android:layout_alignParentEnd="true" />

    <TextView
        android:layout_width="wrap_content"
        android:layout_height="wrap_content"
        android:textAppearance="?android:attr/textAppearanceMedium"
        android:text="@string/donateSubtitle"
        android:id="@+id/donateSubtitle"
        android:layout_below="@+id/donateTitle"
        android:layout_alignParentStart="true"
        android:layout_marginTop="27dp"
        android:layout_alignEnd="@+id/donateTitle" />

    <Button
        android:layout_width="wrap_content"
        android:layout_height="wrap_content"
        android:text="@string/donateButton"
        android:id="@+id/donateButton"
        android:layout_alignParentBottom="true"
        android:layout_centerHorizontal="true"
        android:layout_marginBottom="47dp" />
</RelativeLayout>
strings.xml
<resources>
    <string name="app_name">Donation.1.0</string>
    <string name="action_settings">Settings</string>
    <string name="donateTitle">Welcome Homer</string>
    <string name="donateSubtitle">Please Give Generously</string>
    <string name="donateButton">Donate</string>
</resources>
If there is a deviation from the above - retrace your steps (delete the button) until you can match the above.
We can now switch our attention to the Donate Activity class :
package ie.app;

import android.os.Bundle;
import android.support.design.widget.FloatingActionButton;
import android.support.design.widget.Snackbar;
import android.support.v7.app.AppCompatActivity;
import android.support.v7.widget.Toolbar;
import android.view.View;
import android.view.Menu;
import android.view.MenuItem;

public class Donate extends AppCompatActivity {

    @Override
    protected void onCreate(Bundle savedInstanceState) {
        super.onCreate(savedInstanceState);
        setContentView(R.layout.activity_donate);
        Toolbar toolbar = (Toolbar) findViewById(R.id.toolbar);
        setSupportActionBar(toolbar);

        FloatingActionButton fab = (FloatingActionButton) findViewById(R.id.fab);
        fab.setOnClickListener(new View.OnClickListener() {
            @Override
            public void onClick(View view) {
                Snackbar.make(view, "Replace with your own action", Snackbar.LENGTH_LONG)
                        .setAction("Action", null).show();
            }
        });
    }

    @Override
    public boolean onCreateOptionsMenu(Menu menu) {
        // Inflate the menu; this adds items to the action bar if it is present.
        getMenuInflater().inflate(R.menu.menu_donate, menu);
        return true;
    }

    @Override
    public boolean onOptionsItemSelected(MenuItem item) {
        // Handle action bar item clicks here. The action bar will
        // automatically handle clicks on the Home/Up button, so long
        // as you specify a parent activity in AndroidManifest.xml.
        int id = item.getItemId();

        //noinspection SimplifiableIfStatement
        if (id == R.id.action_settings) {
            return true;
        }

        return super.onOptionsItemSelected(item);
    }
}
For any 'controls' a user can interact with we usually find it useful to associate a class member with that object. Currently we only have one - a Button. The text fields we don't consider 'interactive' as such, so we will not include those.
Insert the following new field into the class:
private Button donateButton;The class will have to be imported. The class name will always match the name in the Palette:
We are free to call the variable anything we like. However, in order to keep confusion to a minimum, always call the variable by the same name you used in the Outline view:
In onCreate() - we need to initialise this variable:
donateButton = (Button) findViewById(R.id.donateButton);We might also add a logging message so we can have some feedback as the app launches:
if (donateButton != null)
{
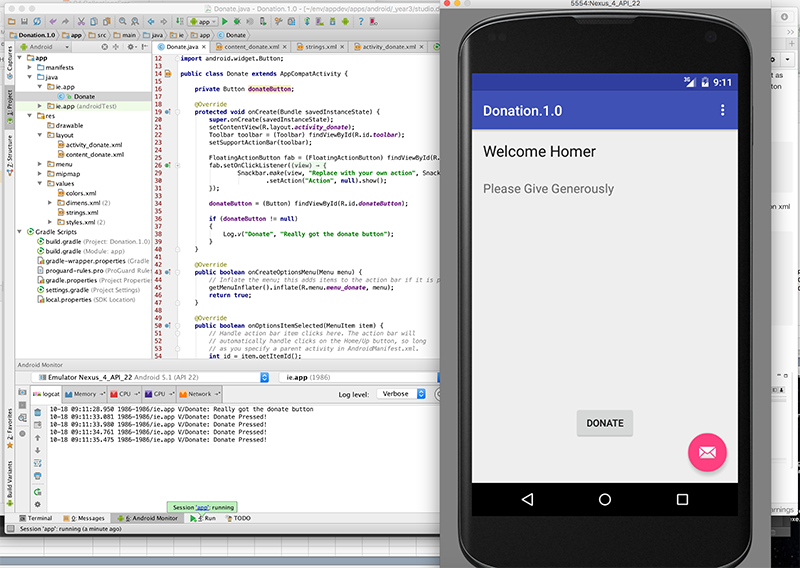
Log.v("Donate", "Really got the donate button");
}This is the complete activity class:
package ie.app;
import android.os.Bundle;
import android.support.design.widget.FloatingActionButton;
import android.support.design.widget.Snackbar;
import android.support.v7.app.AppCompatActivity;
import android.support.v7.widget.Toolbar;
import android.util.Log;
import android.view.View;
import android.view.Menu;
import android.view.MenuItem;
import android.widget.Button;
public class Donate extends AppCompatActivity {
private Button donateButton;
@Override
protected void onCreate(Bundle savedInstanceState) {
super.onCreate(savedInstanceState);
setContentView(R.layout.activity_donate);
Toolbar toolbar = (Toolbar) findViewById(R.id.toolbar);
setSupportActionBar(toolbar);
FloatingActionButton fab = (FloatingActionButton) findViewById(R.id.fab);
fab.setOnClickListener(new View.OnClickListener() {
@Override
public void onClick(View view) {
Snackbar.make(view, "Replace with your own action", Snackbar.LENGTH_LONG)
.setAction("Action", null).show();
}
});
donateButton = (Button) findViewById(R.id.donateButton);
if (donateButton != null)
{
Log.v("Donate", "Really got the donate button");
}
}
@Override
public boolean onCreateOptionsMenu(Menu menu) {
// Inflate the menu; this adds items to the action bar if it is present.
getMenuInflater().inflate(R.menu.menu_donate, menu);
return true;
}
@Override
public boolean onOptionsItemSelected(MenuItem item) {
// Handle action bar item clicks here. The action bar will
// automatically handle clicks on the Home/Up button, so long
// as you specify a parent activity in AndroidManifest.xml.
int id = item.getItemId();
//noinspection SimplifiableIfStatement
if (id == R.id.action_settings) {
return true;
}
return super.onOptionsItemSelected(item);
}
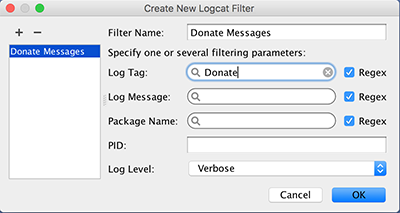
}Finding the log message can be very difficult, unless you set a filter. In the 'LogCat' view in Android Studio, create a filter like this:
Choose "Edit Filter Configuration" on the right-hand-side of the LogCat View
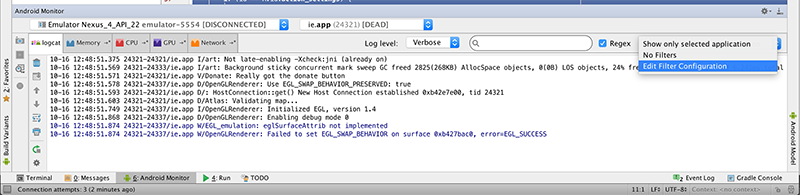
Enter the name and filter as below
and if you then select the filter, we should see our message:
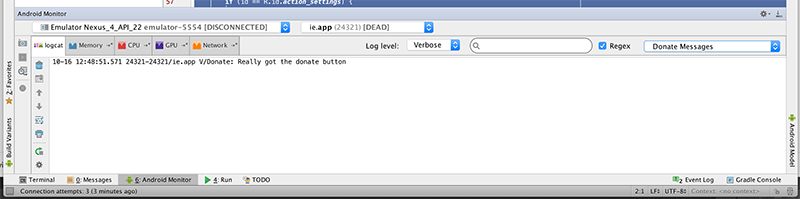
Run the app again, and verify the above message appears.
Step 04 - Documentation
The android documentation is particularly helpful and well designed. These are the two key starting points:
- http://developer.android.com/guide/components/index.html
- http://developer.android.com/reference/packages.html
The first is designed to be read though as a guide, perhaps independent of any work in Android Studio. You should get into the habit of devoting an hour or two a week just reading this section.
The Reference guide should always be open as you are working on labs or projects, and you should make a serious effort to get to grips with at least some of the information here.
Taking the Button class we have just started using. We can immediately find the reference just by knowing the import statement in our Activity class:
import android.widget.Button;.. translates to
(note the last three segments match the package name). Open this page now. Read just as far as the "Button Style" heading. There seems to be two ways of learning when an button event occurs. The first method is using the event handler/listener - but a second easier method is also available.
Try this now. Bring in a new method into the Donate class:
  public void donateButtonPressed (View view)
  {
    Log.v("Donate", "Donate Pressed!");
   }
Then, edit the content_donate.xml file - and add a new 'onClick' attribute into the Button xml fragment:
(the very last entry)
    <Button
        android:layout_width="wrap_content"
        android:layout_height="wrap_content"
        android:text="@string/donateButton"
        android:id="@+id/donateButton"
        android:layout_alignParentBottom="true"
        android:layout_centerHorizontal="true"
        android:layout_marginBottom="47dp"
        android:onClick="donateButtonPressed"/>
Save everything and execute the app, and monitor the log as you press the button:
We now have our first interaction working!
Step 05 - New Control Layout
Recall the UI we are trying to implement:
We need radio buttons, some sort of selection/combo box + a progress bar. These can be found in various locations in the pallette:
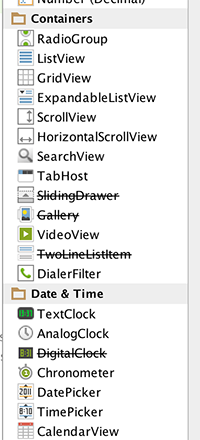
RadioGroup, ProgressBar and NumberPicker seem likely candidates. The names of these controls are exactly as advertised, and we can expect them to be in the 'widgets' package. To verify this, try importing them at the top of the Donate activity class:
import android.widget.RadioGroup;
import android.widget.NumberPicker;
import android.widget.ProgressBar;
... and we can bring in three fields into the class:
  private RadioGroup   paymentMethod;
  private ProgressBar  progressBar;
  private NumberPicker amountPicker;
We can also open up three pages of documentation - which we can reverse engineer from the package/class names:
- http://developer.android.com/reference/android/widget/RadioGroup.html
- http://developer.android.com/reference/android/widget/ProgressBar.html
- http://developer.android.com/reference/android/widget/NumberPicker.html
Note this time we have gone to the Activity class before actually creating the controls. We should do this now - and remember to use the same names (for the IDs) as we create the controls.

and
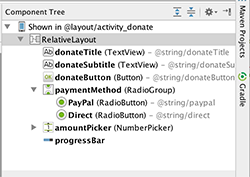
Getting the layout +id names as shown above may take some practice. However, it is an essential skill to get on top of, even it it takes a lot of trial and error.
For reference purposes (try to do it yourself first!), these are the relevant generated xml files:
content_donate.xml
<?xml version="1.0" encoding="utf-8"?>
<RelativeLayout xmlns:android="http://schemas.android.com/apk/res/android"
    xmlns:tools="http://schemas.android.com/tools"
    xmlns:app="http://schemas.android.com/apk/res-auto" android:layout_width="match_parent"
    android:layout_height="match_parent" android:paddingLeft="@dimen/activity_horizontal_margin"
    android:paddingRight="@dimen/activity_horizontal_margin"
    android:paddingTop="@dimen/activity_vertical_margin"
    android:paddingBottom="@dimen/activity_vertical_margin"
    app:layout_behavior="@string/appbar_scrolling_view_behavior"
    tools:showIn="@layout/activity_donate" tools:context=".Donate">

    <TextView
        android:layout_width="wrap_content"
        android:layout_height="wrap_content"
        android:textAppearance="?android:attr/textAppearanceLarge"
        android:text="@string/donateTitle"
        android:id="@+id/donateTitle"
        android:layout_alignParentTop="true"
        android:layout_alignParentStart="true"
        android:layout_alignParentEnd="true" />

    <TextView
        android:layout_width="wrap_content"
        android:layout_height="wrap_content"
        android:textAppearance="?android:attr/textAppearanceMedium"
        android:text="@string/donateSubtitle"
        android:id="@+id/donateSubtitle"
        android:layout_below="@+id/donateTitle"
        android:layout_alignParentStart="true"
        android:layout_marginTop="27dp"
        android:layout_alignEnd="@+id/donateTitle" />

    <Button
        android:layout_width="wrap_content"
        android:layout_height="wrap_content"
        android:text="@string/donateButton"
        android:id="@+id/donateButton"
        android:layout_alignParentBottom="true"
        android:layout_centerHorizontal="true"
        android:layout_marginBottom="47dp"
        android:onClick="donateButtonPressed"/>

    <RadioGroup
        android:layout_width="match_parent"
        android:layout_height="match_parent"
        android:layout_below="@+id/donateSubtitle"
        android:layout_alignParentStart="true"
        android:id="@+id/paymentMethod"
        android:layout_toStartOf="@+id/amountPicker"
        android:layout_above="@+id/progressBar">

        <RadioButton
            android:layout_width="wrap_content"
            android:layout_height="wrap_content"
            android:text="@string/paypal"
            android:id="@+id/PayPal"
            android:checked="false" />

        <RadioButton
            android:layout_width="wrap_content"
            android:layout_height="wrap_content"
            android:text="@string/direct"
            android:id="@+id/Direct"
            android:checked="false" />
    </RadioGroup>

    <NumberPicker
        android:layout_width="wrap_content"
        android:layout_height="wrap_content"
        android:id="@+id/amountPicker"
        android:layout_alignTop="@+id/paymentGroup"
        android:layout_alignEnd="@+id/donateSubtitle" />

    <ProgressBar
        android:layout_width="wrap_content"
        android:layout_height="wrap_content"
        style="?android:attr/progressBarStyleHorizontal"
        android:id="@+id/progressBar"
        android:layout_alignParentStart="true"
        android:layout_alignEnd="@+id/donateSubtitle"
        android:layout_above="@+id/donateButton"
        android:indeterminate="false" />
</RelativeLayout>
strings.xml
<resources>
    <string name="app_name">Donation.1.0</string>
    <string name="action_settings">Settings</string>
    <string name="donateTitle">Welcome Homer</string>
    <string name="donateSubtitle">Please Give Generously</string>
    <string name="donateButton">Donate</string>
    <string name="paypal">PayPal</string>
    <string name="direct">Direct</string>
</resources>
If we have our naming conventions right - then we can bind to these new controls in onCreate():
    paymentMethod = (RadioGroup)   findViewById(R.id.paymentMethod);
    progressBar   = (ProgressBar)  findViewById(R.id.progressBar);
    amountPicker  = (NumberPicker) findViewById(R.id.amountPicker);
This is the complete Donate class so far:
package ie.app;

import android.os.Bundle;
import android.support.design.widget.FloatingActionButton;
import android.support.design.widget.Snackbar;
import android.support.v7.app.AppCompatActivity;
import android.support.v7.widget.Toolbar;
import android.util.Log;
import android.view.View;
import android.view.Menu;
import android.view.MenuItem;
import android.widget.Button;
import android.widget.NumberPicker;
import android.widget.ProgressBar;
import android.widget.RadioGroup;

public class Donate extends AppCompatActivity {

    private Button          donateButton;
    private RadioGroup      paymentMethod;
    private ProgressBar     progressBar;
    private NumberPicker    amountPicker;

    @Override
    protected void onCreate(Bundle savedInstanceState) {
        super.onCreate(savedInstanceState);
        setContentView(R.layout.activity_donate);
        Toolbar toolbar = (Toolbar) findViewById(R.id.toolbar);
        setSupportActionBar(toolbar);

        FloatingActionButton fab = (FloatingActionButton) findViewById(R.id.fab);
        fab.setOnClickListener(new View.OnClickListener() {
            @Override
            public void onClick(View view) {
                Snackbar.make(view, "Replace with your own action", Snackbar.LENGTH_LONG)
                        .setAction("Action", null).show();
            }
        });

        donateButton = (Button) findViewById(R.id.donateButton);

        if (donateButton != null)
        {
            Log.v("Donate", "Really got the donate button");
        }

        paymentMethod = (RadioGroup)   findViewById(R.id.paymentMethod);
        progressBar   = (ProgressBar)  findViewById(R.id.progressBar);
        amountPicker  = (NumberPicker) findViewById(R.id.amountPicker);

        amountPicker.setMinValue(0);
        amountPicker.setMaxValue(1000);
    }

    @Override
    public boolean onCreateOptionsMenu(Menu menu) {
        // Inflate the menu; this adds items to the action bar if it is present.
        getMenuInflater().inflate(R.menu.menu_donate, menu);
        return true;
    }

    @Override
    public boolean onOptionsItemSelected(MenuItem item) {
        // Handle action bar item clicks here. The action bar will
        // automatically handle clicks on the Home/Up button, so long
        // as you specify a parent activity in AndroidManifest.xml.
        int id = item.getItemId();

        //noinspection SimplifiableIfStatement
        if (id == R.id.action_settings) {
            return true;
        }

        return super.onOptionsItemSelected(item);
    }

    public void donateButtonPressed (View view)
    {
        Log.v("Donate", "Donate Pressed!");
    }
}
Step 06 - NumberPicker
This is our reference documentation:
which is a little overwhelming. Back in the guides:
we might find some useful tutorial type introduction to this control - under 'User Interface' - 'Input Controls'
.. and this is the page on 'pickers'
This documentation is concerned with Fragments - a concept that may be difficult to grasp initially, and also explores the usage of date and time pickers.
We can get up and running without this much fuss. Returning to the documentation, these three methods should be sufficient initially:
- http://developer.android.com/reference/android/widget/NumberPicker.html#setMaxValue(int)
- http://developer.android.com/reference/android/widget/NumberPicker.html#setMinValue(int)
- http://developer.android.com/reference/android/widget/NumberPicker.html#getValue()
In onCreate(), initialise the values:
    amountPicker.setMinValue(0);
    amountPicker.setMaxValue(1000);
And in donateButtonPressed():
public void donateButtonPressed (View view)
{
int amount = amountPicker.getValue();
Log.v("Donate", "Donate Pressed! with amount " + amount);
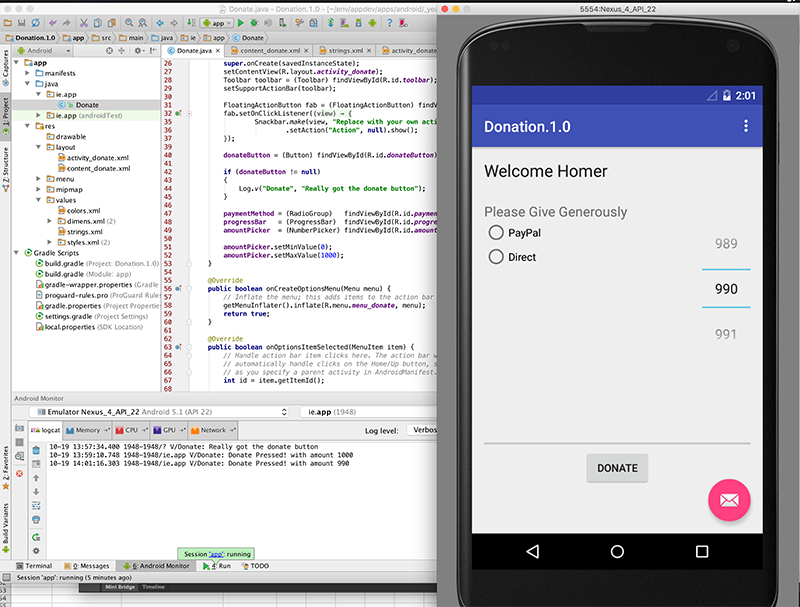
}Run this now - and verify that it operates as expected (see the actual amounts in the log file, as below).
Step 07 - The Radio Buttons
In donateButtonPressed() we need to discover which payment method has been selected. Our RadioGroup documentation is here:
This looks like the method we need:
This is a revised version of donateButtonPressed()
  public void donateButtonPressed (View view)
  {
    int amount = amountPicker.getValue();
    int radioId = paymentMethod.getCheckedRadioButtonId();
    String method = "";
    if (radioId == R.id.PayPal)
    {
      method = "PayPal";
    }
    else
    {
      method = "Direct";
    }
    Log.v("Donate", "Donate Pressed! with amount " + amount + ", method: " + method);
   }
Run it now and verify we are getting the correct logs.
We can simplify it somewhat by reducing the if statement to a single line:
String method = radioId == R.id.PayPal ? "PayPal" : "Direct";This is the Java ternary operator:
This is the complete activity class so far:
package ie.app;

import android.os.Bundle;
import android.support.design.widget.FloatingActionButton;
import android.support.design.widget.Snackbar;
import android.support.v7.app.AppCompatActivity;
import android.support.v7.widget.Toolbar;
import android.util.Log;
import android.view.View;
import android.view.Menu;
import android.view.MenuItem;
import android.widget.Button;
import android.widget.NumberPicker;
import android.widget.ProgressBar;
import android.widget.RadioGroup;

public class Donate extends AppCompatActivity {

    private Button          donateButton;
    private RadioGroup      paymentMethod;
    private ProgressBar     progressBar;
    private NumberPicker    amountPicker;

    @Override
    protected void onCreate(Bundle savedInstanceState) {
        super.onCreate(savedInstanceState);
        setContentView(R.layout.activity_donate);
        Toolbar toolbar = (Toolbar) findViewById(R.id.toolbar);
        setSupportActionBar(toolbar);

        FloatingActionButton fab = (FloatingActionButton) findViewById(R.id.fab);
        fab.setOnClickListener(new View.OnClickListener() {
            @Override
            public void onClick(View view) {
                Snackbar.make(view, "Replace with your own action", Snackbar.LENGTH_LONG)
                        .setAction("Action", null).show();
            }
        });

        donateButton = (Button) findViewById(R.id.donateButton);

        if (donateButton != null)
        {
            Log.v("Donate", "Really got the donate button");
        }

        paymentMethod = (RadioGroup)   findViewById(R.id.paymentMethod);
        progressBar   = (ProgressBar)  findViewById(R.id.progressBar);
        amountPicker  = (NumberPicker) findViewById(R.id.amountPicker);

        amountPicker.setMinValue(0);
        amountPicker.setMaxValue(1000);
    }

    @Override
    public boolean onCreateOptionsMenu(Menu menu) {
        // Inflate the menu; this adds items to the action bar if it is present.
        getMenuInflater().inflate(R.menu.menu_donate, menu);
        return true;
    }

    @Override
    public boolean onOptionsItemSelected(MenuItem item) {
        // Handle action bar item clicks here. The action bar will
        // automatically handle clicks on the Home/Up button, so long
        // as you specify a parent activity in AndroidManifest.xml.
        int id = item.getItemId();

        //noinspection SimplifiableIfStatement
        if (id == R.id.action_settings) {
            return true;
        }

        return super.onOptionsItemSelected(item);
    }

    public void donateButtonPressed (View view)
    {
        int amount = amountPicker.getValue();
        int radioId = paymentMethod.getCheckedRadioButtonId();
        String method = radioId == R.id.PayPal ? "PayPal" : "Direct";
        Log.v("Donate", "Donate Pressed! with amount " + amount + ", method: " + method);
    }
}
So run your app again just to confirm the LogCat entries
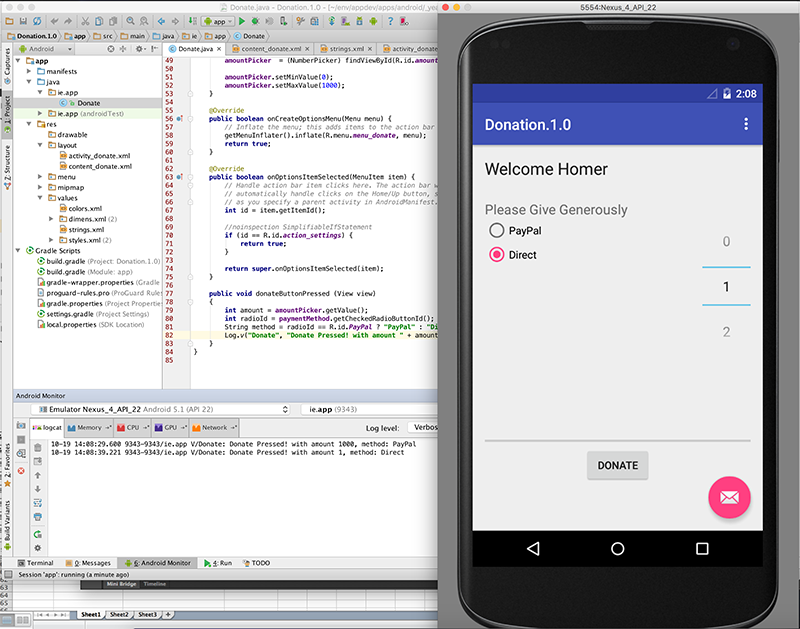
Step 08 - The Progress Bar
The progress bar documentation:
offers us advice on using the progress bar in multi-threaded application. Not quite what we are ready for yet! (but file it away for future reference).
These two methods are probably what we need:
- http://developer.android.com/reference/android/widget/ProgressBar.html#setMax(int)
- http://developer.android.com/reference/android/widget/ProgressBar.html#setProgress(int)
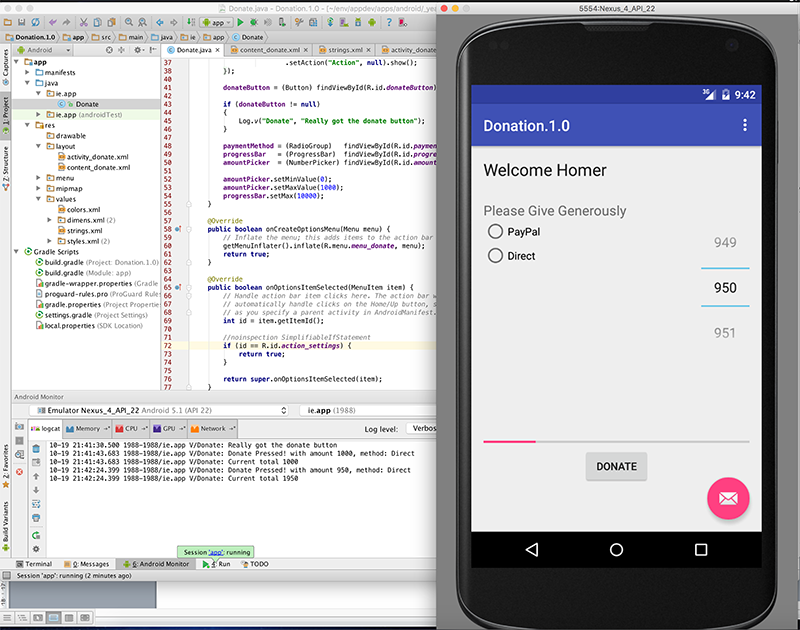
First we would need to equip our activity with the ability to remember the donation amounts:
private int totalDonated = 0;Lets set max progress bar to 10000 in onCreate():
progressBar.setMax(10000);.. and set the progress in donateButtonPressed():
    totalDonated = totalDonated + amount;
    progressBar.setProgress(totalDonated);

    Log.v("Donate", "Donate Pressed! with amount " + amount + ", method: " + method);
    Log.v("Donate", "Current total " + totalDonated);
Try this now and observe the progress bar and logCat
This is the complete class so far:
package ie.app;

import android.os.Bundle;
import android.support.design.widget.FloatingActionButton;
import android.support.design.widget.Snackbar;
import android.support.v7.app.AppCompatActivity;
import android.support.v7.widget.Toolbar;
import android.util.Log;
import android.view.View;
import android.view.Menu;
import android.view.MenuItem;
import android.widget.Button;
import android.widget.NumberPicker;
import android.widget.ProgressBar;
import android.widget.RadioGroup;

public class Donate extends AppCompatActivity {

    private Button          donateButton;
    private RadioGroup      paymentMethod;
    private ProgressBar     progressBar;
    private NumberPicker    amountPicker;

    private int             totalDonated = 0;

    @Override
    protected void onCreate(Bundle savedInstanceState) {
        super.onCreate(savedInstanceState);
        setContentView(R.layout.activity_donate);
        Toolbar toolbar = (Toolbar) findViewById(R.id.toolbar);
        setSupportActionBar(toolbar);

        FloatingActionButton fab = (FloatingActionButton) findViewById(R.id.fab);
        fab.setOnClickListener(new View.OnClickListener() {
            @Override
            public void onClick(View view) {
                Snackbar.make(view, "Replace with your own action", Snackbar.LENGTH_LONG)
                        .setAction("Action", null).show();
            }
        });

        donateButton = (Button) findViewById(R.id.donateButton);

        if (donateButton != null)
        {
            Log.v("Donate", "Really got the donate button");
        }

        paymentMethod = (RadioGroup)   findViewById(R.id.paymentMethod);
        progressBar   = (ProgressBar)  findViewById(R.id.progressBar);
        amountPicker  = (NumberPicker) findViewById(R.id.amountPicker);

        amountPicker.setMinValue(0);
        amountPicker.setMaxValue(1000);
        progressBar.setMax(10000);
    }

    @Override
    public boolean onCreateOptionsMenu(Menu menu) {
        // Inflate the menu; this adds items to the action bar if it is present.
        getMenuInflater().inflate(R.menu.menu_donate, menu);
        return true;
    }

    @Override
    public boolean onOptionsItemSelected(MenuItem item) {
        // Handle action bar item clicks here. The action bar will
        // automatically handle clicks on the Home/Up button, so long
        // as you specify a parent activity in AndroidManifest.xml.
        int id = item.getItemId();

        //noinspection SimplifiableIfStatement
        if (id == R.id.action_settings) {
            return true;
        }

        return super.onOptionsItemSelected(item);
    }

    public void donateButtonPressed (View view)
    {
        int amount = amountPicker.getValue();
        int radioId = paymentMethod.getCheckedRadioButtonId();
        String method = radioId == R.id.PayPal ? "PayPal" : "Direct";

        totalDonated = totalDonated + amount;
        progressBar.setProgress(totalDonated);

        Log.v("Donate", "Donate Pressed! with amount " + amount + ", method: " + method);
        Log.v("Donate", "Current total " + totalDonated);
    }
}
Here is another version of exactly the same class:
package ie.app;

import android.os.Bundle;
import android.support.design.widget.FloatingActionButton;
import android.support.design.widget.Snackbar;
import android.support.v7.app.AppCompatActivity;
import android.support.v7.widget.Toolbar;
import android.util.Log;
import android.view.View;
import android.view.Menu;
import android.view.MenuItem;
import android.widget.Button;
import android.widget.NumberPicker;
import android.widget.ProgressBar;
import android.widget.RadioGroup;

public class Donate extends AppCompatActivity {

    private Button          donateButton;
    private RadioGroup      paymentMethod;
    private ProgressBar     progressBar;
    private NumberPicker    amountPicker;

    private int             totalDonated = 0;

    @Override
    protected void onCreate(Bundle savedInstanceState) {
        super.onCreate(savedInstanceState);
        setContentView(R.layout.activity_donate);
        Toolbar toolbar = (Toolbar) findViewById(R.id.toolbar);
        setSupportActionBar(toolbar);

        FloatingActionButton fab = (FloatingActionButton) findViewById(R.id.fab);
        fab.setOnClickListener(new View.OnClickListener() {
            @Override
            public void onClick(View view) {
                Snackbar.make(view, "Replace with your own action", Snackbar.LENGTH_LONG)
                        .setAction("Action", null).show();
            }
        });

        donateButton = (Button) findViewById(R.id.donateButton);

        if (donateButton != null)
        {
            Log.v("Donate", "Really got the donate button");
        }

        paymentMethod = (RadioGroup)   findViewById(R.id.paymentMethod);
        progressBar   = (ProgressBar)  findViewById(R.id.progressBar);
        amountPicker  = (NumberPicker) findViewById(R.id.amountPicker);

        amountPicker.setMinValue(0);
        amountPicker.setMaxValue(1000);
        progressBar.setMax(10000);
    }

    @Override
    public boolean onCreateOptionsMenu(Menu menu) {
        // Inflate the menu; this adds items to the action bar if it is present.
        getMenuInflater().inflate(R.menu.menu_donate, menu);
        return true;
    }

    @Override
    public boolean onOptionsItemSelected(MenuItem item) {
        // Handle action bar item clicks here. The action bar will
        // automatically handle clicks on the Home/Up button, so long
        // as you specify a parent activity in AndroidManifest.xml.
        int id = item.getItemId();

        //noinspection SimplifiableIfStatement
        if (id == R.id.action_settings) {
            return true;
        }

        return super.onOptionsItemSelected(item);
    }

    public void donateButtonPressed (View view)
    {
    totalDonated  = totalDonated + amountPicker.getValue();
    String method = paymentMethod.getCheckedRadioButtonId() == R.id.PayPal ? "PayPal" : "Direct";
    progressBar.setProgress(totalDonated);

    Log.v("Donate", amountPicker.getValue() + " donated by " +  method + "\nCurrent total " + totalDonated);
    }
}
Examine them carefully. What are the differences? Why make these changes?
Note also the careful attention to spacing and alignment in the code. Not just correct indentation, but continual attention to structuring each method carefully, removing duplication and unnecessary code and formatting/aligning the declarations and assignment statements in a table like structure:
Visible here:
  private RadioGroup   paymentMethod;
  private ProgressBar  progressBar;
  private NumberPicker amountPicker;

  private int          totalDonated = 0;
and here:
    paymentMethod = (RadioGroup)   findViewById(R.id.paymentMethod);
    progressBar   = (ProgressBar)  findViewById(R.id.progressBar);
    amountPicker  = (NumberPicker) findViewById(R.id.amountPicker);
and here:
    totalDonated  = totalDonated + amountPicker.getValue();
    String method = paymentMethod.getCheckedRadioButtonId() == R.id.PayPal ? "PayPal" : "Direct";
Android code can become very verbose and complex. Carefully formatting is essential if you are not to be overwhelmed.
Exercises
Archive of lab so far:
Exercise 1:
Consider an alternative to the NumberPicker - specifically one of the "Text Fields" controls:
These are mostly EditView objects:
Redesign the activity to take a value from the picker or directly from a text view and maintain a "Total so Far" Value:
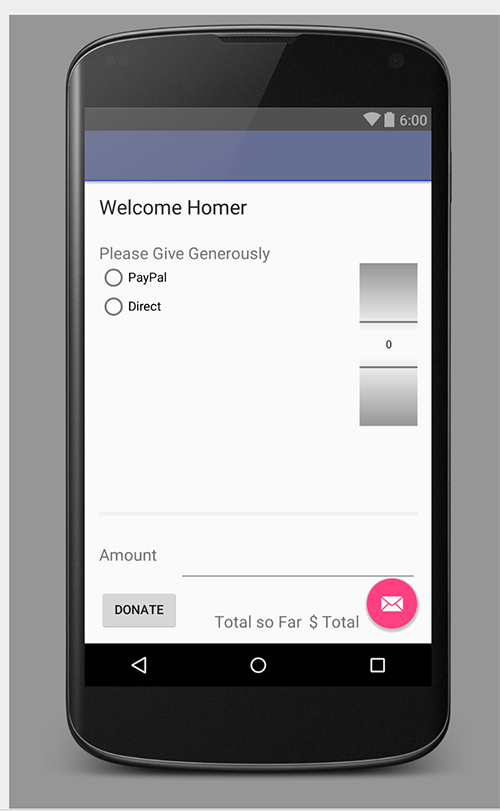
If the number picker is set to zero, then attempt to get a number from the text view.
Here is a hint (a version of donatButonPressed() that does what we want):
  public void donateButtonPressed (View view)
  {
    String method = paymentMethod.getCheckedRadioButtonId() == R.id.PayPal ? "PayPal" : "Direct";
    progressBar.setProgress(totalDonated);

    int donatedAmount =  amountPicker.getValue();
    if (donatedAmount == 0)
    {
      String text = amountText.getText().toString();
      if (!text.equals(""))
        donatedAmount = Integer.parseInt(text);
    }
    totalDonated  = totalDonated + donatedAmount;
    Log.v("Donate", amountPicker.getValue() + " donated by " +  method + "\nCurrent total " + totalDonated);
   }
Exercise 2:
Revise the app such that when the target is achieved (10000) - then no more donations accepted, and the user is made aware of this.
Hint - here is how you can display a simple alert:
Toast.makeText(this, "Target Exceeded!", Toast.LENGTH_SHORT).show();Exercise 3:
Modify the colour scheme for our widgets..
You will notice that the Floating Action Button, the Radio Buttons, the Progress Bar etc, are all a kind of pink - not really in line with our current colour scheme.
Hint - have a look at your colors.xml
Archive of lab with the above Exercises: