Objectives
This lab continues our Case Study CoffeeMate but with a major refactoring of the UI (using a Navigation Drawer) and a more detailed look at the use of Fragments and persistence (through an SQLite Database) in an Android App.
Setup - Starter Code
As this version of our case study has been substantially refactored to begin with, it's strongly recommended you download the starter code for this lab here - CoffeeMate.4.0.Starter. It contains all the resources you'll need to complete this lab along with some of the code and features already completed.
Once you import the CoffeeMate 4.0 Starter Project it should looks as follows:

Take some time to familiarise yourself with the new classes in your project and explore the resources that you will be referring to throughout the lab, especially the layouts in both 'Graphical Layout' view and 'XML' view for the Navigation Drawer (and it's associated resources and menus). It's also probably a good idea to run the App at this stage too, so you can set up your AVD (if you haven't done so already) and confirm that the starter app is configured properly and running as discussed.
In this lab, you are required to do the following:
Add a Splash Screen (to make the app a bit more 'appealing')
Carry out a complete refactoring of the project to
- update existing Fragments for usage with a Navigation Drawer
- implement new Fragments to add in the necessary extra functionality
- remove any residual classes and resources no longer needed
- Add Database Support to CoffeeMate to manage our coffees
The following steps will guide you through these requirements, so we'll start with Splash Screen.
Adding a Splash Screen
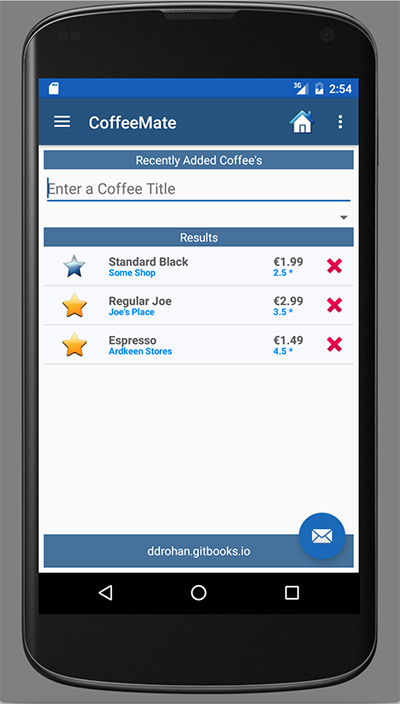
First of all, confirm that when you run the starter code you get the following:

and then

You've probably guessed we already have the Splash screen implemented, but
Before you move on to the next step, it's worth taking a quick look at the manifest file to see the changes that have been made to ensure the Splash Screen acts like a 'Splash Screen', and is the first Screen you see when the app launches.
It's also worth testing the app to see the 'Favourites' feature working and even delete/update any 'Favourite' coffees to see how the app handles an empty list.
App Refactoring - Our 'Add' Option (Part 1)
Once you've properly tested the latest version of CoffeeMate, you'll see that we only have The 'Home' & 'View Favourites' implemented (from the starter App). This step will take you through building a new Fragment AddFragment and reusing a lot of the 'Add' activity code and resources.
First, go ahead and create a new (Blank) Fragment called AddFragment in the fragments package with the following options :
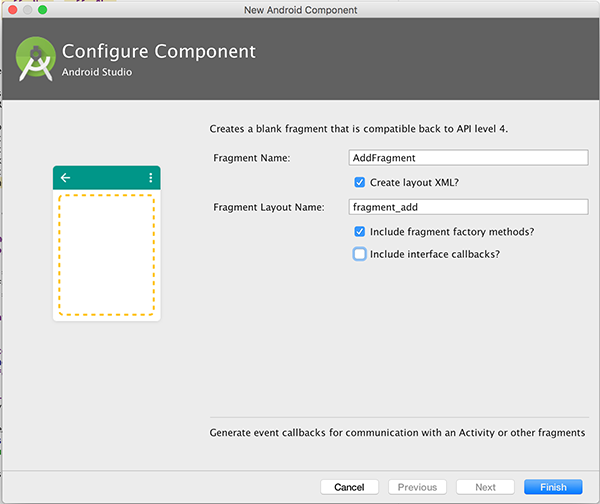
You'll get a fair bit of 'boilerplate' code, which we don't need for this project, so before continuing, ensure your new AddFragment initially looks like this
public class AddFragment extends Fragment {

    public AddFragment() {
        // Required empty public constructor
    }

    public static AddFragment newInstance() {
        AddFragment fragment = new AddFragment();

        return fragment;
    }

    @Override
    public void onCreate(Bundle savedInstanceState) {
        super.onCreate(savedInstanceState);

    }

    @Override
    public View onCreateView(LayoutInflater inflater, ViewGroup container,
                             Bundle savedInstanceState) {
        // Inflate the layout for this fragment
        return inflater.inflate(R.layout.fragment_add, container, false);
    }
}
The next step is to replace the default fragment layout with our existing 'Add' activity layout so once you're done, you should have a layout like this for 'fragment_add'

Here's the xml if you're stuck for time.
 <FrameLayout xmlns:android="http://schemas.android.com/apk/res/android"
    xmlns:tools="http://schemas.android.com/tools"
    android:layout_width="match_parent"
    android:layout_height="match_parent"
    tools:context="ie.cm.fragments.AddFragment">

    <RelativeLayout
        android:layout_width="fill_parent"
        android:layout_height="fill_parent"
        android:gravity="center">

        <Button
            android:id="@+id/saveCoffeeBtn"
            style="@android:style/Holo.Light.ButtonBar"
            android:layout_width="wrap_content"
            android:layout_height="wrap_content"
            android:layout_alignParentEnd="true"
            android:layout_alignParentStart="true"
            android:layout_below="@+id/coffeeRatingBar"
            android:layout_marginTop="20dp"
            android:drawableTop="@drawable/ic_save_coffee"
            android:text="@string/saveCoffeeBtn" />

        <RatingBar
            android:id="@+id/coffeeRatingBar"
            android:layout_width="wrap_content"
            android:layout_height="wrap_content"
            android:layout_below="@+id/ratingTextView"
            android:layout_centerHorizontal="true"
            android:layout_marginTop="18dp"
            android:numStars="5"
            android:progressTint="@color/bannerBGColor"
            android:rating="2"
            android:stepSize="0.5" />

        <EditText
            android:id="@+id/nameEditText"
            android:layout_width="200dp"
            android:layout_height="wrap_content"
            android:layout_alignEnd="@+id/coffeeRatingBar"
            android:layout_alignParentTop="true"
            android:layout_marginTop="11dp"
            android:ems="10"
            android:inputType="textShortMessage">

            <requestFocus />

        </EditText>

        <EditText
            android:id="@+id/shopEditText"
            android:layout_width="200dp"
            android:layout_height="wrap_content"
            android:layout_alignStart="@+id/nameEditText"
            android:layout_below="@+id/nameEditText"
            android:layout_marginTop="15dp"
            android:ems="10"
            android:inputType="textShortMessage"></EditText>

        <TextView
            android:id="@+id/ratingTextView"
            android:layout_width="120dp"
            android:layout_height="wrap_content"
            android:layout_alignStart="@+id/priceTextView"
            android:layout_below="@+id/priceEditText"
            android:layout_marginTop="31dp"
            android:text="@string/coffeeRatingLbl"
            android:textColor="@color/appFontColor"
            android:textSize="18sp" />

        <TextView
            android:id="@+id/nameTextView"
            android:layout_width="60dp"
            android:layout_height="20dp"
            android:layout_alignBaseline="@+id/nameEditText"
            android:layout_alignBottom="@+id/nameEditText"
            android:layout_toStartOf="@+id/nameEditText"
            android:gravity="top"
            android:text="@string/coffeeNameLbl"
            android:textColor="@color/appFontColor"
            android:textSize="18sp" />

        <EditText
            android:id="@+id/priceEditText"
            android:layout_width="100dp"
            android:layout_height="wrap_content"
            android:layout_alignStart="@+id/shopEditText"
            android:layout_below="@+id/shopEditText"
            android:layout_marginTop="18dp"
            android:ems="10"
            android:inputType="numberDecimal" />

        <TextView
            android:id="@+id/shopTextView"
            android:layout_width="wrap_content"
            android:layout_height="wrap_content"
            android:layout_alignBaseline="@+id/shopEditText"
            android:layout_alignBottom="@+id/shopEditText"
            android:layout_alignStart="@+id/nameTextView"
            android:text="@string/coffeeShopLbl"
            android:textColor="@color/appFontColor"
            android:textSize="18sp" />

        <TextView
            android:id="@+id/priceTextView"
            android:layout_width="wrap_content"
            android:layout_height="wrap_content"
            android:layout_alignBaseline="@+id/priceEditText"
            android:layout_alignBottom="@+id/priceEditText"
            android:layout_alignStart="@+id/shopTextView"
            android:text="@string/coffeePriceLbl"
            android:textColor="@color/appFontColor"
            android:textSize="18sp" />

    </RelativeLayout>

</FrameLayout>
We can now go ahead and implement the necessary code to add this fragment to the 'Home Screen'. We won't implement the actual logic until the next step, we'll just get the 'Add' screen loading, so navigate to your Home activity class and see can you get the add feature to load the relevant screen.
Note : if you get an import error on your AddFragment just ensure you have
import android.app.Fragment;instead of
import android.support.v4.app.Fragment;in your import statements (as this may throw up another error later on).
App Refactoring - Our 'Add' Option (Part 2)
Here's the code you should have implemented (or something similar) to get the 'Add' screen loading
 fragment = AddFragment.newInstance();
 ft.replace(R.id.homeFrame, fragment);
 ft.addToBackStack(null);
 ft.commit();
and just for completeness, you may have noticed that the title bar we're using for our 'Add' screen still displays

so add the following to your AddFragment (and fix the errors)
  @Override
    public void onResume() {
        super.onResume();

        titleBar = (TextView) getActivity().findViewById(R.id.recentAddedBarTextView);
        titleBar.setText(R.string.addACoffeeLbl);
    }
and run the app again to confirm you get the following

Now we can implement the logic behind the View to add a new coffee to our list of coffees.
We already have all the code we need in our 'Add' activity so go ahead and see can you complete this step without referring to the supporting lecture material.
And don't forget to remove the 'Add' activity (and associated layout) from the project, as we don't need them anymore.
App Refactoring - Our 'Search' Option (Part 1)
We'll take a similar approach with this feature as we did with the add feature - we'll get the navigation and screen up and running first, and then implement the logic.
In the previous version of CoffeeMate (Version 3.0) our 'Search' feature was implemented via a separate layout in a Search activity and we extended our CoffeeFragment to customise our Search (in a SearchFragment). To maintain our current navigation design pattern we should really remove our existing 'Search' activity and manage everything in another Fragment - so that's what we'll do.
First, we need a new layout for our Search, so either copy/paste one of the existing fragment layouts, or go ahead and create a new one (I copied the fragment_home layout and went from there).
We already have most of the layout we need in the 'Search' xml file so see can you put together a layout similar to the following:
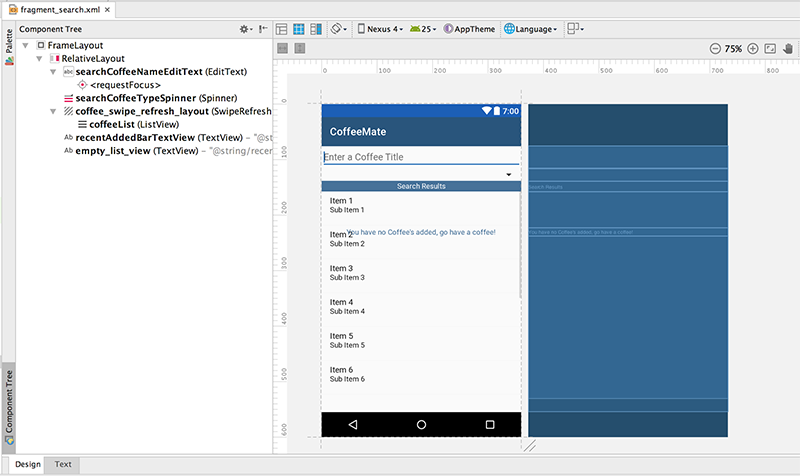
If it all gets a bit much for you :) here's the complete xml code but it's really worth having a go yourself first, as it will help you develop your layout design skills.
 <FrameLayout xmlns:android="http://schemas.android.com/apk/res/android"
    xmlns:tools="http://schemas.android.com/tools"
    android:layout_width="match_parent"
    android:layout_height="match_parent"
    tools:context="ie.cm.fragments.SearchFragment">

    <RelativeLayout
        android:layout_width="fill_parent"
        android:layout_height="486dp"
        android:gravity="center" >

        <EditText
            android:id="@+id/searchCoffeeNameEditText"
            android:layout_width="match_parent"
            android:layout_height="wrap_content"
            android:inputType="text"
            android:hint="@string/searchCoffeeHint"
            android:layout_alignParentTop="true"
            android:layout_alignParentStart="true">

            <requestFocus />
        </EditText>

        <Spinner
            android:id="@+id/searchCoffeeTypeSpinner"
            android:layout_width="match_parent"
            android:layout_height="wrap_content"
            android:prompt="@string/searchCoffeeTypePrompt"
            android:layout_below="@+id/searchCoffeeNameEditText"
            android:layout_alignParentStart="true"
            android:paddingBottom="10dp" />

        <android.support.v4.widget.SwipeRefreshLayout
        android:id="@+id/coffee_swipe_refresh_layout"
        android:layout_width="match_parent"
        android:layout_height="107dp"
        android:layout_alignParentStart="true"
            android:layout_below="@+id/recentAddedBarTextView"
            android:layout_alignParentBottom="true">

        <ListView
            android:id="@+id/coffeeList"
            android:layout_width="match_parent"
            android:layout_height="match_parent"
            android:layout_gravity="right|bottom">
        </ListView>

    </android.support.v4.widget.SwipeRefreshLayout>

        <TextView
        android:id="@+id/recentAddedBarTextView"
        style="@style/banner"
        android:layout_width="match_parent"
        android:layout_height="wrap_content"
        android:text="@string/searchCoffeesResultsLbl"
        android:layout_gravity="center"
        android:layout_below="@+id/searchCoffeeTypeSpinner"
        android:layout_alignParentStart="true" />

        <TextView
            android:id="@+id/empty_list_view"
            android:layout_width="match_parent"
            android:layout_height="wrap_content"
            android:gravity="center"
            android:text="@string/recentlyViewedEmptyMessage"
            android:textColor="@color/headerBGColor"
            android:layout_alignParentTop="true"
            android:layout_alignParentStart="true"
            android:layout_marginTop="157dp" />

    </RelativeLayout>
</FrameLayout>
The next thing we need to do is associate this layout with our existing SearchFragment and bind to the widgets such as the Spinner, the EditText etc.
Even though our SearchFragment extends from CoffeeFragment, we can't use the standard CoffeeFragment layout so the first thing we need to do is bring in (and override) the onCreateView() method for our SearchFragment.
Introduce the following to your SearchFragment fragment
@Override
    public View onCreateView(LayoutInflater inflater, ViewGroup container,
                             Bundle savedInstanceState) {

        View v = inflater.inflate(R.layout.fragment_search, container, false);

        listView = (ListView) v.findViewById(R.id.coffeeList); //Bind to the list on our Search layout

        return v;
    }
Can you explain why we need to bind to the 'coffeeList' ListView widget? (comment out the line of code and run the app once you've completed the 'wiring up', and see does that give you any clues?).
Now, 'wire up' a new instance of this fragment to the Search option on the Navigation Drawer, similar to how we did the 'Add' and 'View Favourites'.
If you run the app at this stage (which you should) you'll probably get a NullPointerException error, so be clear why we need to move some existing code from onCreate() to onCreateView(), and carry out some refactoring, like so
@Override
    public View onCreateView(LayoutInflater inflater, ViewGroup container,
                             Bundle savedInstanceState) {

        super.onCreateView(inflater,container,savedInstanceState);

        View v = inflater.inflate(R.layout.fragment_search, container, false);

        ArrayAdapter<CharSequence> spinnerAdapter = ArrayAdapter
                .createFromResource(getActivity(), R.array.coffeeTypes,
                        android.R.layout.simple_spinner_item);

        spinnerAdapter
                .setDropDownViewResource(android.R.layout.simple_spinner_dropdown_item);

        Spinner spinner = ((Spinner) v.findViewById(R.id.searchCoffeeTypeSpinner));
        spinner.setAdapter(spinnerAdapter);
        spinner.setOnItemSelectedListener(this);

        EditText nameText = (EditText)v.findViewById(R.id.searchCoffeeNameEditText);
        nameText.addTextChangedListener(this);

        listView = (ListView) v.findViewById(R.id.coffeeList); //Bind to the list on our Search layout

        setListView(listView,v);

        return v;
    }
Notice there's a new setListView(listView,v) method. This has been introduced to reduce some code redundancy, so make sure it's implemented in the super CoffeeFragment class. Here's the code you need for this method
public void setListView(ListView listview, View v) {
    listview.setChoiceMode(ListView.CHOICE_MODE_MULTIPLE_MODAL);
    listview.setMultiChoiceModeListener(this);

    listview.setAdapter (listAdapter);
    listview.setOnItemClickListener(this);
    listview.setEmptyView(getActivity().findViewById(R.id.empty_list_view));
  }
Once you've made the necessary changes, run the app again and confirm you get the following after you choose the 'Search' option:
You'll notice that the spinner and filter are working - another example of the benefits of using (and reusing) Fragments.
For completeness, add the following to the Fragment
@Override
public void onResume() {
super.onResume();
titleBar.setText(R.string.searchCoffeesLbl);
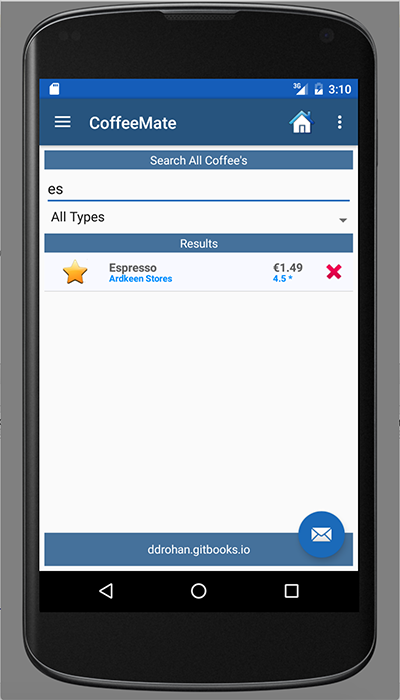
}When you're done, you should be able to Search & Filter as normal (as with the previous version) only this time it's all nice and contained in a Fragment, like so:
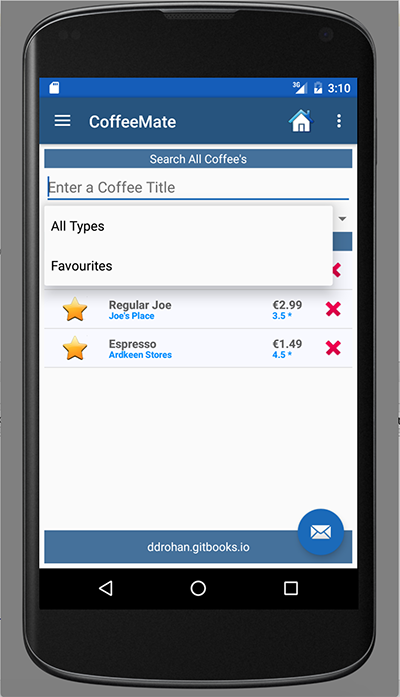
and
App Refactoring - Our 'Edit' Option (Part 1)
This step is similar to our 'Add' Fragment implementation but there's a bit more complexity involved as we need to
- Create a new Fragment (EditFragment) (similar to Add)
- Recycle the 'Edit' Layout for use with our new Fragment (similar to Add)
and
- Pass the relevant Coffee Data from the 'Coffee List' (managed within the CoffeeFragment) to the EditFragment
AND
- Implement a callback interface from our Fragment to our Activity to handle the 'favourites star' toggle and the update button.
Note: We could simply have our EditFragment implement an onClick Listener, but this is an opportunity to demonstrate how to communicate between a Fragment and an Activity.
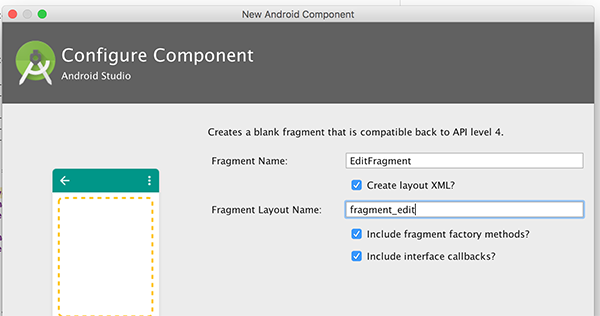
So first of all, go ahead and create the Fragment (and it's associated layout) but this time, make sure you choose to Include interface Callbacks, like so .
Then, modify the boilerplate code so that the newInstance() method takes a 'Bundle' object (called coffeeBundle) as a parameter.
Now, our current onItemClick() method inside our CoffeeFragment, looks like this
@Override
public void onItemClick(AdapterView<?> parent, View view, int position, long id)
{
Bundle activityInfo = new Bundle();
activityInfo.putInt("coffeeID", view.getId());

Intent goEdit = new Intent(getActivity(), Edit.class);
goEdit.putExtras(activityInfo);
getActivity().startActivity(goEdit);
}
so see if you can implement the necessary code to 'switch to' the EditFragment instead of launching the Edit activity (We'll revist this code in Part 2 to complete the Edit feature).
Hint: have a look at your Home activity and how we manage our Fragments.
Next, you need to update your layout, so again, have a go at that, but to help you along here's the layout I copied from our 'Add' and refactored to suit our needs.
<FrameLayout xmlns:android="http://schemas.android.com/apk/res/android"
xmlns:tools="http://schemas.android.com/tools"
android:layout_width="match_parent"
android:layout_height="match_parent"
tools:context="ie.cm.fragments.EditFragment">
<RelativeLayout
android:layout_width="fill_parent"
android:layout_height="wrap_content"
android:gravity="center"
android:layout_gravity="center_horizontal|bottom">
<LinearLayout
android:id="@+id/linearLayout1"
android:layout_width="match_parent"
android:layout_height="wrap_content"
android:orientation="vertical"
android:paddingBottom="5dp"
android:paddingLeft="10dp"
android:paddingRight="10dp"
android:paddingTop="5dp" >
<TableLayout
android:id="@+id/tableLayout1"
android:layout_width="match_parent"
android:layout_height="wrap_content" >
<TableRow
android:id="@+id/tableRow1"
android:layout_width="wrap_content"
android:layout_height="0dp"
android:layout_weight="1"
tools:ignore="UselessParent" >
<TextView
android:id="@+id/coffeeNameTextView"
android:layout_width="300dp"
android:layout_marginStart="5dp"
android:text="The Title"
android:textColor="@color/colorPrimary"
android:textSize="24sp"
tools:ignore="HardcodedText" />
<ImageView
android:id="@+id/favouriteImageView"
android:layout_width="40dp"
android:layout_height="40dp"
android:src="@drawable/ic_favourite_off"
tools:ignore="ContentDescription"
android:onClick="toggle" />
</TableRow>
</TableLayout>
<TextView
android:id="@+id/coffeeShopTextView"
android:layout_width="match_parent"
android:layout_height="wrap_content"
android:text="The Description..."
android:textColor="@color/bannerBGColor"
tools:ignore="HardcodedText"
android:textSize="18sp"
android:layout_marginStart="5dp" />
</LinearLayout>
<TextView
android:id="@+id/barTextView"
style="@style/banner"
android:layout_width="match_parent"
android:layout_height="wrap_content"
android:text="@string/coffeeDetailsLbl"
android:layout_below="@+id/linearLayout1"
android:layout_alignParentStart="true" />
<RatingBar
android:id="@+id/coffeeRatingBar"
android:layout_width="wrap_content"
android:layout_height="wrap_content"
android:numStars="5"
android:rating="2"
android:stepSize="0.5"
android:progressTint="@color/bannerBGColor"
android:layout_above="@+id/updateCoffeeBtn"
android:layout_centerHorizontal="true" />
<EditText
android:id="@+id/nameEditText"
android:layout_width="200dp"
android:layout_height="wrap_content"
android:ems="10"
android:inputType="textShortMessage"
android:layout_below="@+id/barTextView"
android:layout_alignStart="@+id/shopEditText"
tools:ignore="LabelFor">
<requestFocus />
</EditText>
<EditText
android:id="@+id/shopEditText"
android:layout_width="200dp"
android:layout_height="wrap_content"
android:ems="10"
android:inputType="textShortMessage"
android:layout_alignTop="@+id/shopTextView"
android:layout_alignEnd="@+id/coffeeRatingBar"
tools:ignore="LabelFor">
</EditText>
<TextView
android:id="@+id/ratingTextView"
android:layout_width="wrap_content"
android:layout_height="wrap_content"
android:text="@string/coffeeRatingLbl"
android:textColor="@color/appFontColor"
android:textSize="18sp"
android:layout_above="@+id/coffeeRatingBar"
android:layout_alignStart="@+id/priceTextView" />
<TextView
android:id="@+id/nameTextView"
android:layout_width="60dp"
android:layout_height="20dp"
android:gravity="top"
android:text="@string/coffeeNameLbl"
android:textColor="@color/appFontColor"
android:textSize="18sp"
android:layout_below="@+id/barTextView"
android:layout_toStartOf="@+id/nameEditText"
android:layout_marginTop="2dp" />
<EditText
android:id="@+id/priceEditText"
android:layout_width="100dp"
android:layout_height="wrap_content"
android:ems="10"
android:inputType="numberDecimal"
android:layout_below="@+id/shopEditText"
android:layout_alignStart="@+id/shopEditText"
tools:ignore="LabelFor" />
<TextView
android:id="@+id/shopTextView"
android:layout_width="wrap_content"
android:layout_height="wrap_content"
android:text="@string/coffeeShopLbl"
android:textColor="@color/appFontColor"
android:textSize="18sp"
android:layout_below="@+id/nameEditText"
android:layout_alignStart="@+id/nameTextView" />
<TextView
android:id="@+id/priceTextView"
android:layout_width="wrap_content"
android:layout_height="wrap_content"
android:text="@string/coffeePriceLbl"
android:textColor="@color/appFontColor"
android:textSize="18sp"
android:layout_alignTop="@+id/priceEditText"
android:layout_alignStart="@+id/shopTextView" />
<Button
android:id="@+id/updateCoffeeBtn"
style="@android:style/Holo.Light.ButtonBar"
android:layout_width="match_parent"
android:layout_height="wrap_content"
android:drawableTop="@drawable/ic_save_coffee"
android:text="@string/updateCoffeeBtnLbl"
android:layout_alignParentBottom="true"
android:layout_centerHorizontal="true"
android:layout_marginBottom="38dp"
android:onClick="update"/>
</RelativeLayout>
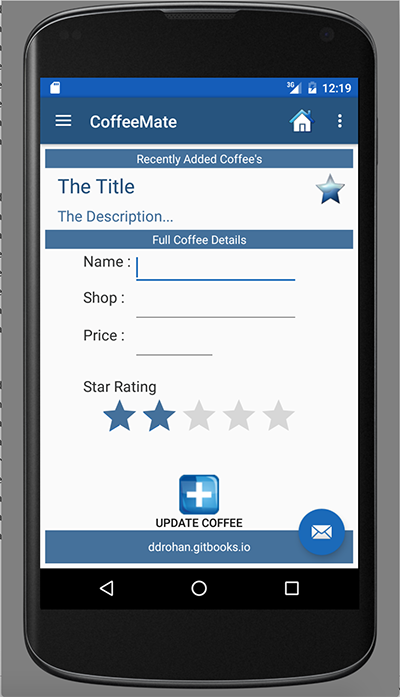
</FrameLayout>Run you app and confirm you get a blank Edit Screen when you select a row in the coffee list, like so:
But you get an error instead??
Can you try a quick fix to get the app running?
App Refactoring - Our 'Edit' Option (Part 2)
The problem with the previous step was the Main Activity (in out case 'Home' must implement the OnFragmentInteractionListener interface (for the callbacks) so you can carry out a quick fix like so

choosing to Implement methods.
Run your app again just to make sure everything is working as expected. OnFragmentInteractionListener isn't really of any use at the moment, but we'll come back to that later.
Now, This step involves recycling a lot of our existing code from our Add Activity but also implementing a callback interface, a lot of which is actually supplied for us via Android Studio when we create a Fragment.
First of all, ensure your CoffeeFragment's onItemClick() looks something like this
@Override
public void onItemClick(AdapterView<?> parent, View view, int position, long id)
{
    Bundle activityInfo = new Bundle();
    activityInfo.putInt("coffeeID", view.getId());

    FragmentTransaction ft = getFragmentManager().beginTransaction();
    Fragment fragment = EditFragment.newInstance(activityInfo);
    ft.replace(R.id.homeFrame, fragment);
    ft.addToBackStack(null);
    ft.commit();
}
and your initial EditFragment looks something like this
public class EditFragment extends Fragment {
    // TODO: Rename parameter arguments, choose names that match
    // the fragment initialization parameters, e.g. ARG_ITEM_NUMBER
    private static final String ARG_PARAM1 = "param1";
    private static final String ARG_PARAM2 = "param2";

    // TODO: Rename and change types of parameters
    private String mParam1;
    private String mParam2;

    private OnFragmentInteractionListener mListener;

    public EditFragment() {
        // Required empty public constructor
    }

    // TODO: Rename and change types and number of parameters
    public static EditFragment newInstance(Bundle coffeeBundle) {
        EditFragment fragment = new EditFragment();
        Bundle args = new Bundle();

        fragment.setArguments(args);
        return fragment;
    }

    @Override
    public void onCreate(Bundle savedInstanceState) {
        super.onCreate(savedInstanceState);
        if (getArguments() != null) {
            mParam1 = getArguments().getString(ARG_PARAM1);
            mParam2 = getArguments().getString(ARG_PARAM2);
        }
    }

    @Override
    public View onCreateView(LayoutInflater inflater, ViewGroup container,
                             Bundle savedInstanceState) {
        // Inflate the layout for this fragment
        return inflater.inflate(R.layout.fragment_edit, container, false);
    }

    // TODO: Rename method, update argument and hook method into UI event
    public void onButtonPressed(Uri uri) {
        if (mListener != null) {
            mListener.onFragmentInteraction(uri);
        }
    }

    @Override
    public void onAttach(Context context) {
        super.onAttach(context);
        if (context instanceof OnFragmentInteractionListener) {
            mListener = (OnFragmentInteractionListener) context;
        } else {
            throw new RuntimeException(context.toString()
                    + " must implement OnFragmentInteractionListener");
        }
    }

    @Override
    public void onDetach() {
        super.onDetach();
        mListener = null;
    }

    /**
     * This interface must be implemented by activities that contain this
     * fragment to allow an interaction in this fragment to be communicated
     * to the activity and potentially other fragments contained in that
     * activity.
     * <p/>
     * See the Android Training lesson <a href=
     * "http://developer.android.com/training/basics/fragments/communicating.html"
     * >Communicating with Other Fragments</a> for more information.
     */
    public interface OnFragmentInteractionListener {
        // TODO: Update argument type and name
        void onFragmentInteraction(Uri uri);
    }
}
Now, we need to first of all, be able to display our coffee data on our Edit screen, so see can you reuse what you already have in your existing activity and incorporate it in your new EditFragment. What you're looking for is something like this (if we selected 'Regular Joe' from our list)
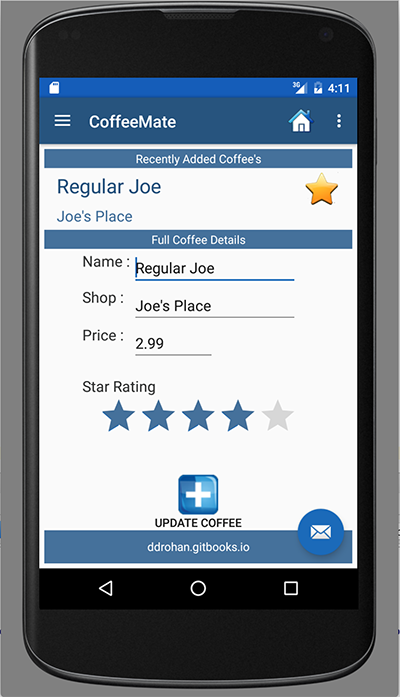
So revisit how it's implemented in the Edit Activity and how you can leverage that to get it to work in the EditFragment.
Hint: You need to do something very similar to what you did with the AddFragment insofar as you need to refactor the onCreateView() method but also add the following to your onCreate() method, to retrieve the correct coffee data before you display it.
@Override
public void onCreate(Bundle savedInstanceState)
{
    super.onCreate(savedInstanceState);
        if(getArguments() != null)
            aCoffee = getCoffeeObject(getArguments().getInt("coffeeID"));
}
The final step is to implement our listeners for the update button and the 'toggle'.
App Refactoring - Our 'Edit' Option (Part 3)
As we're using (and replacing) Fragments instead of switching between Activities, we have two options when trying to implement event handling. We can
- Implement the event handling and listeners 'in house' and manage everything inside the Fragment - but this can get a bit tricky when we want to handle more than one event (like our situation)
or
- we implement a callback listener to the parent activity (in our case 'Home'), which ties in with the particular navigation pattern we're trying to adhere to - so this is what we'll do.
If you recall, Android Studio generated a lot of boilerplate code for us, including some template callback listeners - which we needed to implement, to get a version of our app running. We'll now revisit this code (and the whole EditFragment) and complete our 'Edit' feature.
First, familiarise yourself with the particular listener we need to implement
public interface OnFragmentInteractionListener
{
// TODO: Update argument type and name
void onFragmentInteraction(Uri uri);
}
and the default methods to 'hook up', attach/detach to the UI event
// TODO: Rename method, update argument and hook method into UI event

public void onButtonPressed(Uri uri)
{
if (mListener != null) {
    mListener.onFragmentInteraction(uri);
    }
}

@Override
public void onAttach(Context context)
{
    super.onAttach(context);
        if (context instanceof OnFragmentInteractionListener) {
            mListener = (OnFragmentInteractionListener) context;
            }
            else {
                    throw new RuntimeException(context.toString()
                            + " must implement OnFragmentInteractionListener");
            }
}

@Override
public void onDetach()
{
    super.onDetach();
    mListener = null;
}
Next, bring in the existing methods from the Edit activity ('toggle' and 'update') and fix any errors.
Note: Seeing as we need to bind to the widgets both for displaying and updating it's probably best to use class-wide widget variables (like we did for our 'Add') so before you proceed, make sure your onCreateView() and update() methods look something like this
@Override
public View onCreateView(LayoutInflater inflater, ViewGroup container, Bundle savedInstanceState) {

    View v = inflater.inflate(R.layout.fragment_edit, container, false);

    ((TextView)v.findViewById(R.id.coffeeNameTextView)).setText(aCoffee.name);
    ((TextView)v.findViewById(R.id.coffeeShopTextView)).setText(aCoffee.shop);

    name = (EditText)v.findViewById(R.id.nameEditText); name.setText(aCoffee.name);
    shop = (EditText)v.findViewById(R.id.shopEditText); shop.setText(aCoffee.shop);
    price = (EditText)v.findViewById(R.id.priceEditText); price.setText(""+aCoffee.price);
    ratingBar = (RatingBar) v.findViewById(R.id.coffeeRatingBar); ratingBar.setRating((float)aCoffee.rating);

    favouriteImage = (ImageView) v.findViewById(R.id.favouriteImageView);
        if (aCoffee.favourite == true) {
            favouriteImage.setImageResource(R.drawable.ic_favourite_on);
            isFavourite = true;
        } else {
            favouriteImage.setImageResource(R.drawable.ic_favourite_off);
            isFavourite = false;
        }
    return v;
}
public void update(View v) {
if (mListener != null) {
String coffeeName = name.getText().toString();
String coffeeShop = shop.getText().toString();
String coffeePriceStr = price.getText().toString();
double ratingValue = ratingBar.getRating();
double coffeePrice;
try {
coffeePrice = Double.parseDouble(coffeePriceStr);
} catch (NumberFormatException e)
{ coffeePrice = 0.0; }
if ((coffeeName.length() > 0) && (coffeeShop.length() > 0) && (coffeePriceStr.length() > 0)) {
aCoffee.name = coffeeName;
aCoffee.shop = coffeeShop;
aCoffee.price = coffeePrice;
aCoffee.rating = ratingValue;
}
} else
Toast.makeText(getActivity(), "You must Enter Something for Name and Shop", Toast.LENGTH_SHORT).show();
}
}The last thing we need to do is refactor our Listener interface to reflect the events we want to handle so replace the existing interface with this one
public interface OnFragmentInteractionListener {
    void toggle(View v);
    void update(View v);
}
And use the Android Studio Tools to implement these new methods back in our 'Home' activity (and fix any residual errors).
Here's the implementation for the 'toggle'
@Override
public void toggle(View v) {
    EditFragment editFrag = (EditFragment) getFragmentManager().findFragmentById(R.id.homeFrame);
        if (editFrag != null) {
                editFrag.toggle(v);
        }
    }
so have a go at implementing the 'update'.
App Refactoring - Our 'Edit' Option (Part 4)
Now, once you've tried to confirm that your update and toggle features are working as expected, you've probably noticed you have to manually navigate back to the previous screen when you click the update button.
To improve the user experience somewhat, we can ensure that the user is automatically returned to the previous screen after they've selected the update button - no matter which screen they were on. This can be achieved with the following code, so add this to your Fragment and run your app again and see what happens.
if (getFragmentManager().getBackStackEntryCount() > 0) {
                getFragmentManager().popBackStack();
                return;
         }
Also, to avoid the soft keyboard overlapping or obscuring our edittexts, place the following in the manifest file in the 'Home' activity tag
android:windowSoftInputMode="adjustPan|adjustResize"Note : there were a few issues with the layout initially, so if your fragment_edit layout isn't as expected you can replace it with the following (which now has a ConstraintLayout layout)
<FrameLayout xmlns:android="http://schemas.android.com/apk/res/android"
    xmlns:app="http://schemas.android.com/apk/res-auto"
    xmlns:tools="http://schemas.android.com/tools"
    android:layout_width="match_parent"
    android:layout_height="match_parent"
    tools:context="ie.cm.fragments.EditFragment">

    <android.support.constraint.ConstraintLayout
        android:layout_width="fill_parent"
        android:layout_height="fill_parent"
        android:layout_marginTop="10dp"
        android:gravity="center">

        <TextView
            android:id="@+id/coffeeShopTextView"
            android:layout_width="344dp"
            android:layout_height="wrap_content"
            android:layout_marginTop="43dp"
            android:text="The Description..."
            android:textColor="@color/bannerBGColor"
            android:textSize="18sp"
            app:layout_constraintLeft_toLeftOf="parent"
            app:layout_constraintTop_toTopOf="parent"
            tools:ignore="HardcodedText"
            tools:layout_constraintLeft_creator="1"
            tools:layout_constraintTop_creator="1" />

        <Button
            android:id="@+id/saveCoffeeBtn"
            style="@android:style/Holo.Light.ButtonBar"
            android:layout_width="369dp"
            android:layout_height="68dp"
            android:layout_marginBottom="1dp"
            android:layout_marginTop="8dp"
            android:drawableTop="@drawable/ic_save_coffee"
            android:onClick="update"
            android:text="@string/updateCoffeeBtnLbl"
            app:layout_constraintBottom_toBottomOf="parent"
            app:layout_constraintHorizontal_bias="0.0"
            app:layout_constraintLeft_toLeftOf="parent"
            app:layout_constraintRight_toLeftOf="@+id/coffeeRatingBar"
            app:layout_constraintTop_toBottomOf="@+id/coffeeRatingBar"
            tools:layout_constraintBottom_creator="1"
            tools:layout_constraintLeft_creator="1"
            app:layout_constraintVertical_bias="0.054" />

        <RatingBar
            android:id="@+id/coffeeRatingBar"
            android:layout_width="wrap_content"
            android:layout_height="wrap_content"
            android:layout_marginStart="20dp"
            android:numStars="5"
            android:progressTint="@color/bannerBGColor"
            android:rating="2"
            android:stepSize="0.5"
            app:layout_constraintLeft_toLeftOf="@+id/ratingTextView"
            app:layout_constraintTop_toBottomOf="@+id/ratingTextView"
            tools:layout_constraintLeft_creator="1"
            tools:layout_constraintTop_creator="1" />

        <EditText
            android:id="@+id/nameEditText"
            android:layout_width="0dp"
            android:layout_height="wrap_content"
            android:ems="10"
            android:inputType="textShortMessage"
            app:layout_constraintLeft_toLeftOf="@+id/shopEditText"
            app:layout_constraintRight_toRightOf="@+id/shopEditText"
            app:layout_constraintTop_toBottomOf="@+id/barTextView"
            tools:layout_constraintLeft_creator="1"
            tools:layout_constraintRight_creator="1"
            tools:layout_constraintTop_creator="1"
            android:layout_marginTop="10dp"
            app:layout_constraintHorizontal_bias="0.0"
            tools:ignore="LabelFor">

            <requestFocus />

        </EditText>

        <TextView
            android:id="@+id/coffeeNameTextView"
            android:layout_width="0dp"
            android:layout_height="wrap_content"
            android:text="The Title"
            android:textColor="@color/colorPrimary"
            android:textSize="24sp"
            app:layout_constraintLeft_toLeftOf="parent"
            app:layout_constraintRight_toLeftOf="@+id/favouriteImageView"
            app:layout_constraintTop_toTopOf="parent"
            tools:ignore="HardcodedText"
            tools:layout_constraintLeft_creator="1"
            tools:layout_constraintRight_creator="1"
            tools:layout_constraintTop_creator="1" />

        <ImageView
            android:id="@+id/favouriteImageView"
            android:layout_width="53dp"
            android:layout_height="36dp"
            android:layout_marginEnd="19dp"
            android:onClick="toggle"
            android:src="@drawable/ic_favourite_off"
            app:layout_constraintBottom_toBottomOf="@+id/coffeeNameTextView"
            app:layout_constraintRight_toRightOf="@+id/coffeeShopTextView"
            app:layout_constraintTop_toTopOf="parent"
            app:layout_constraintVertical_bias="0.0"
            tools:ignore="ContentDescription"
            tools:layout_constraintBottom_creator="1"
            tools:layout_constraintRight_creator="1"
            tools:layout_constraintTop_creator="1" />

        <EditText
            android:id="@+id/shopEditText"
            android:layout_width="200dp"
            android:layout_height="wrap_content"
            android:layout_marginTop="5dp"
            android:ems="10"
            android:inputType="textShortMessage"
            app:layout_constraintHorizontal_bias="0.505"
            app:layout_constraintLeft_toRightOf="@+id/priceEditText"
            app:layout_constraintRight_toRightOf="@+id/priceEditText"
            app:layout_constraintTop_toBottomOf="@+id/nameEditText"
            tools:layout_constraintLeft_creator="1"
            tools:layout_constraintRight_creator="1"
            tools:layout_constraintTop_creator="1"
            tools:ignore="LabelFor"></EditText>

        <TextView
            android:id="@+id/ratingTextView"
            android:layout_width="120dp"
            android:layout_height="wrap_content"
            android:layout_marginStart="52dp"
            android:layout_marginTop="13dp"
            android:text="@string/coffeeRatingLbl"
            android:textColor="@color/appFontColor"
            android:textSize="18sp"
            app:layout_constraintLeft_toLeftOf="parent"
            app:layout_constraintTop_toBottomOf="@+id/priceEditText"
            tools:layout_constraintLeft_creator="1"
            tools:layout_constraintTop_creator="1" />

        <TextView
            android:id="@+id/nameTextView"
            android:layout_width="0dp"
            android:layout_height="20dp"
            android:gravity="top"
            android:text="@string/coffeeNameLbl"
            android:textColor="@color/appFontColor"
            android:textSize="18sp"
            app:layout_constraintBaseline_toBaselineOf="@+id/nameEditText"
            app:layout_constraintLeft_toLeftOf="@+id/shopTextView"
            app:layout_constraintRight_toLeftOf="@+id/nameEditText"
            tools:layout_constraintBaseline_creator="1"
            tools:layout_constraintLeft_creator="1"
            tools:layout_constraintRight_creator="1" />

        <EditText
            android:id="@+id/priceEditText"
            android:layout_width="100dp"
            android:layout_height="wrap_content"
            android:layout_marginEnd="113dp"
            android:layout_marginStart="112dp"
            android:layout_marginTop="10dp"
            android:ems="10"
            android:inputType="numberDecimal"
            app:layout_constraintLeft_toLeftOf="@+id/barTextView"
            app:layout_constraintRight_toRightOf="@+id/favouriteImageView"
            app:layout_constraintTop_toBottomOf="@+id/shopEditText"
            tools:layout_constraintLeft_creator="1"
            tools:layout_constraintRight_creator="1"
            tools:layout_constraintTop_creator="1"
            tools:ignore="LabelFor" />

        <TextView
            android:id="@+id/shopTextView"
            android:layout_width="wrap_content"
            android:layout_height="wrap_content"
            android:layout_marginEnd="11dp"
            android:text="@string/coffeeShopLbl"
            android:textColor="@color/appFontColor"
            android:textSize="18sp"
            app:layout_constraintBaseline_toBaselineOf="@+id/shopEditText"
            app:layout_constraintRight_toLeftOf="@+id/shopEditText"
            tools:layout_constraintBaseline_creator="1"
            tools:layout_constraintRight_creator="1" />

        <TextView
            android:id="@+id/priceTextView"
            android:layout_width="wrap_content"
            android:layout_height="wrap_content"
            android:layout_marginTop="21dp"
            android:text="@string/coffeePriceLbl"
            android:textColor="@color/appFontColor"
            android:textSize="18sp"
            app:layout_constraintLeft_toLeftOf="@+id/shopTextView"
            app:layout_constraintRight_toRightOf="@+id/shopTextView"
            app:layout_constraintTop_toBottomOf="@+id/shopTextView"
            tools:layout_constraintLeft_creator="1"
            tools:layout_constraintRight_creator="1"
            tools:layout_constraintTop_creator="1" />

        <TextView
            android:id="@+id/barTextView"
            style="@style/banner"
            android:layout_width="383dp"
            android:layout_height="24dp"
            android:layout_marginTop="7dp"
            android:text="@string/coffeeDetailsLbl"
            app:layout_constraintLeft_toLeftOf="parent"
            app:layout_constraintTop_toBottomOf="@+id/coffeeShopTextView"
            tools:layout_constraintLeft_creator="1"
            tools:layout_constraintTop_creator="1"
            android:layout_marginStart="1dp" />

    </android.support.constraint.ConstraintLayout>
</FrameLayout>
The final step in this lab is to add database support, which we'll do next.
App Refactoring - Adding Database Support
Before we complete this step, there's a few classes you need to import to help you along. Once you import the necessary Database classes, this step is relatively straight forward - all you have to do is replace the method calls that manages the coffeeList with the respective dbManager calls.
First thing to do is download the necessary database classes in the database archive and add them to a new ie.cm.db package in your project.
Take a few moments to investigate the classes and familiarise yourself with the methods you'll be using. There are a number of classes you'll need to modify to add database support to your project, but initially, you need to create an instance of DBManager in CofeeMateApp.java and both open/close the database when necessary.
Our DBManager instance inside our Application Object
public class CoffeeMateApp extends Application {
    //public List <Coffee>  coffeeList = new ArrayList<Coffee>();
    public DBManager  dbManager = new DBManager(this);

    @Override
    public void onCreate()
    {
        super.onCreate();
        Log.v("coffeemate", "CoffeeMate App Started");
        dbManager.open();
    }

    @Override
    public void onTerminate()
    {
    super.onTerminate();
    dbManager.close();
    }
}
Once you make this change (and save the file) you'll get a number of errors, which actually indicates which classes you need to now update and add the database calls (and remove the coffeeList calls). Each error requires only one line of code to be fixed, so have a go and updating each of the classes (and we'll have a look at the solution near the end of the Practical Lab).
Once you fix all the errors, and run the app again, you should see your coffee list - but this time those coffees are stored in a database.
And as a final check, if you call the setupList() method of the DBManager reference in your CoffeeMateApp reference 'app' (replacing the existing setup method in 'Home') you should see the following list:

After some testing you may find that your adapter isn't functioning as expected in certain circumstances when deleting multiple coffees. This is due to the fact that our data is now persistent, so depending on 'where you are', so to speak, some slight refactoring of our deleteCoffees() is required, like so
public void deleteCoffees(ActionMode actionMode)
  {
    Coffee c = null;
    for (int i = listAdapter.getCount() - 1; i >= 0; i--) {
      if (listView.isItemChecked(i)) {
        activity.app.dbManager.delete(listAdapter.getItem(i).coffeeId); //delete from DB
        listAdapter.coffeeList.remove(listAdapter.getItem(i)); // update adapters data
      }
    }

    actionMode.finish();

    if (favourites) {
      //Update the filters data
      coffeeFilter = new CoffeeFilter(Base.app.dbManager.getAll(),"favourites",listAdapter);
      coffeeFilter.filter(null);
    }
    listAdapter.notifyDataSetChanged();
  }
Test again to confirm and go have a coffee!
Well Done!
Solution
As an exercise, try and refactor the Help Option to use a fragment instead of an activity, to adhere to the UI Navigation Design Pattern we're using.
This is a solution to the lab: